Flight Plan Form
Aici creezi un plan de zbor nou sau modifici o ciornă existentă. Sunt două moduri: Zone, pentru un zbor simplu care începe și se termină în același loc, și Waypoints, pentru o rută între două aerodromuri, cu puncte pe traseu, dacă vrei. În josul paginii poți fie să salvezi o ciornă, fie să depui planul la autoritatea aleasă de tine — ROMATSA sau AACR.
Cum ajungi aici: apeși + în lista Flight Plans, ca să începi un plan nou, sau apeși Edit în pagina de detalii a unei ciorne.
Apasă iconița de ajutor (?) din bara de sus ca să arăți sau să ascunzi indiciul de pe ecran.
Alegerea aeronavei
Primul rând al formularului este un selector Aircraft, cu profilurile de aeronavă pe care le-ai salvat. Alege-o pe cea cu care zbori — ea devine aeronava activă, folosită ca să se construiască planul (este aceeași alegere pe care o poți face din Settings → Aircraft).
Alegerea modului
Sub selectorul de aeronavă, un comutator trece între Waypoints și Zone. Alege întâi modul, fiindcă el schimbă ce câmpuri se văd.
Modul Zone
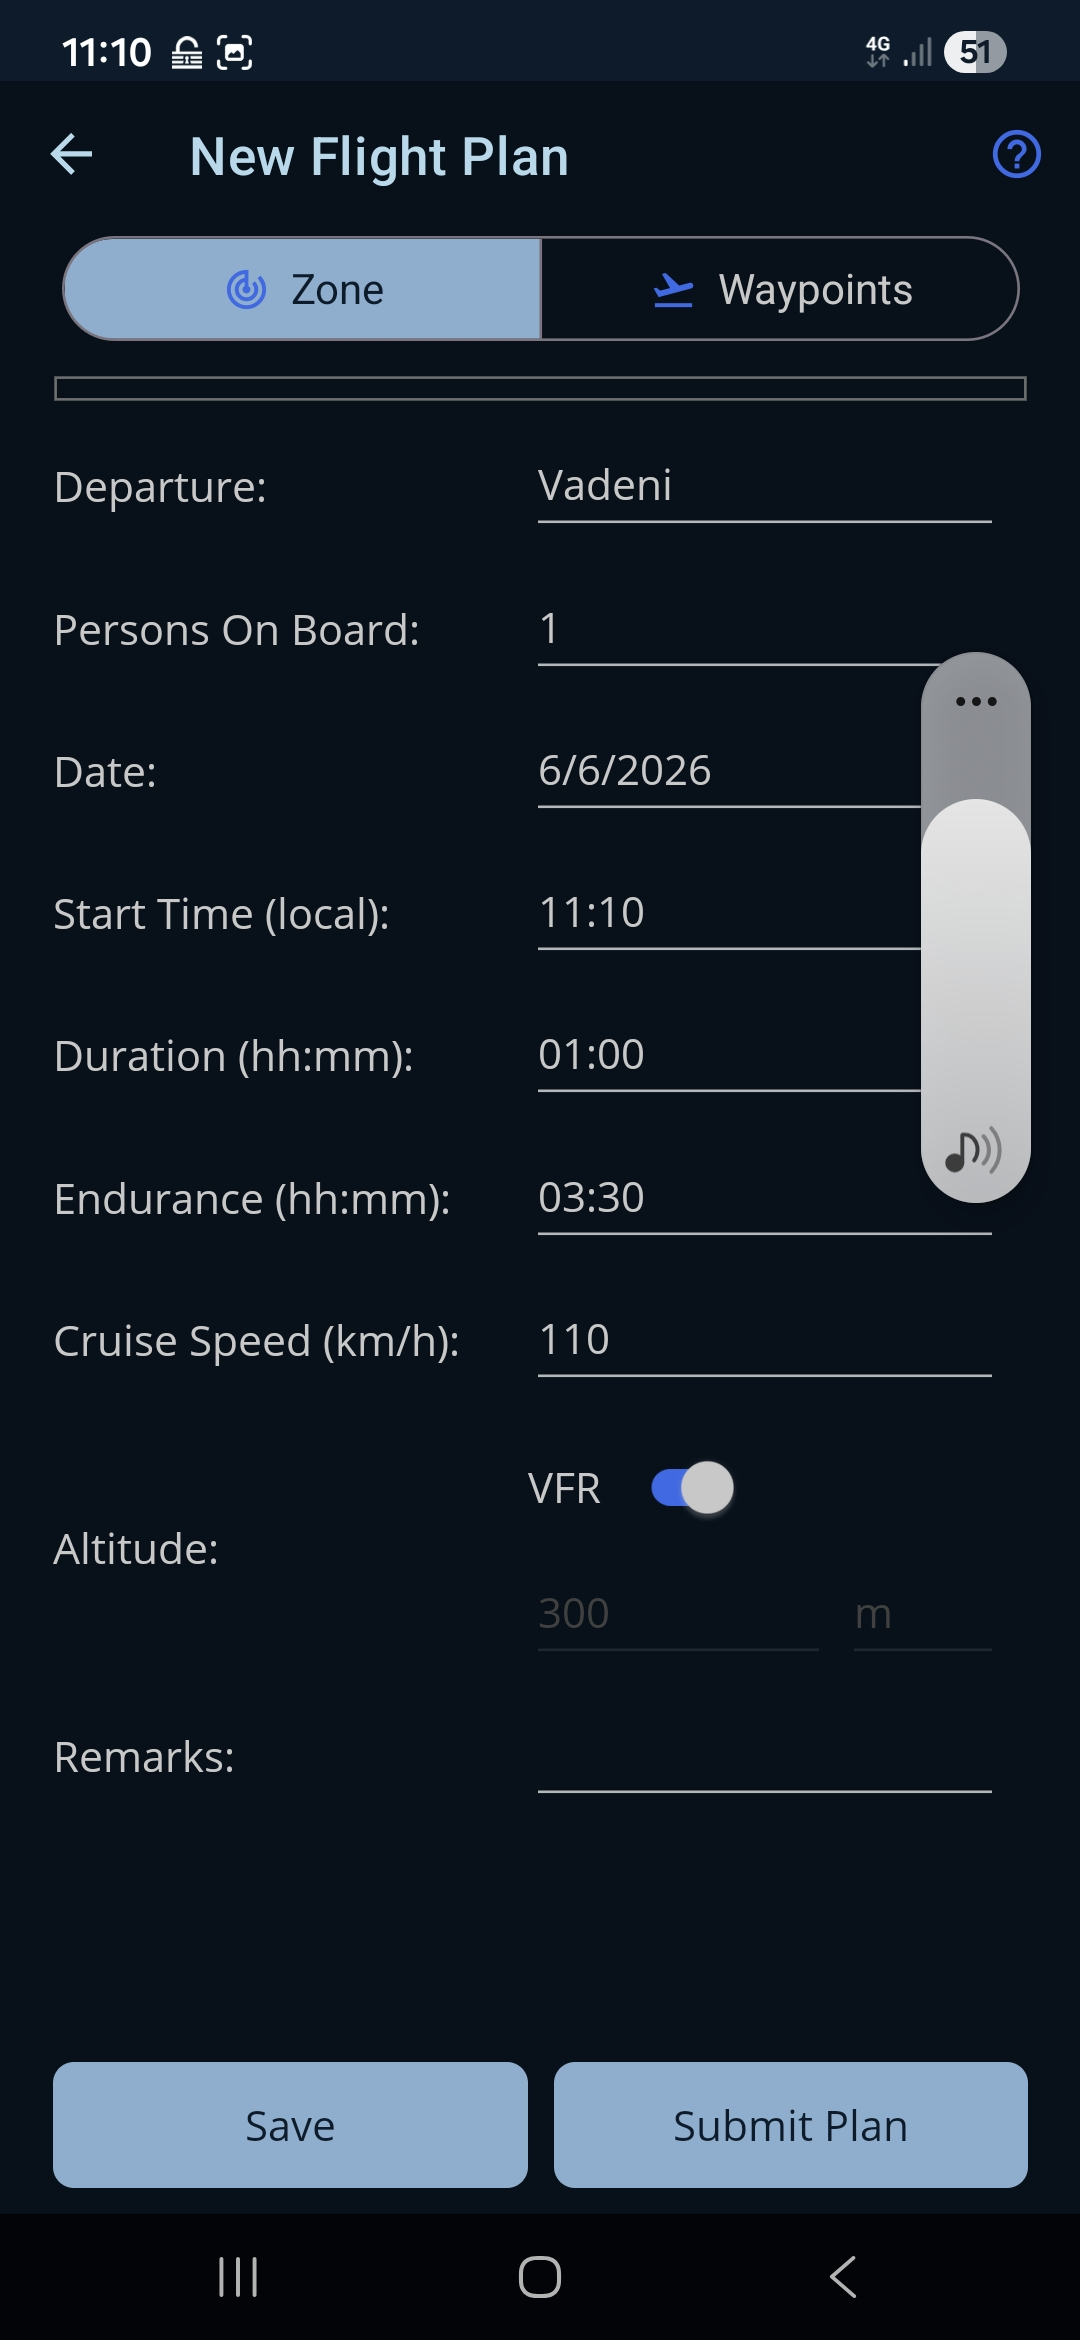
Folosește modul Zone pentru activitate într-o singură zonă (plecarea și destinația sunt același loc). Câmpurile lui sunt:
- Departure. Aerodromul de pe care zbori (și pe care te întorci). Obligatoriu.
- Persons On Board. Câți oameni sunt la bord. Obligatoriu.
- Date. Data zborului.
- Start Time (local). Ora locală de plecare de la locul de staționare.
- Duration (hh:mm). Cât ai de gând să zbori.
- Endurance (hh:mm). Cât îți ajunge combustibilul. Obligatoriu.
- Cruise Speed. Viteza ta de croazieră, în unitatea aleasă de tine (kt sau km/h — se pune din Settings → Pilot → Preferences). Obligatorie.
- VFR și Altitude. Două comenzi independente — vezi mai jos.
- Remarks. Note în text liber pentru planul de zbor (poți scrie pe mai multe rânduri). În modul Zone, câmpul vine completat cu nota de zbor local.
VFR și altitudinea de croazieră
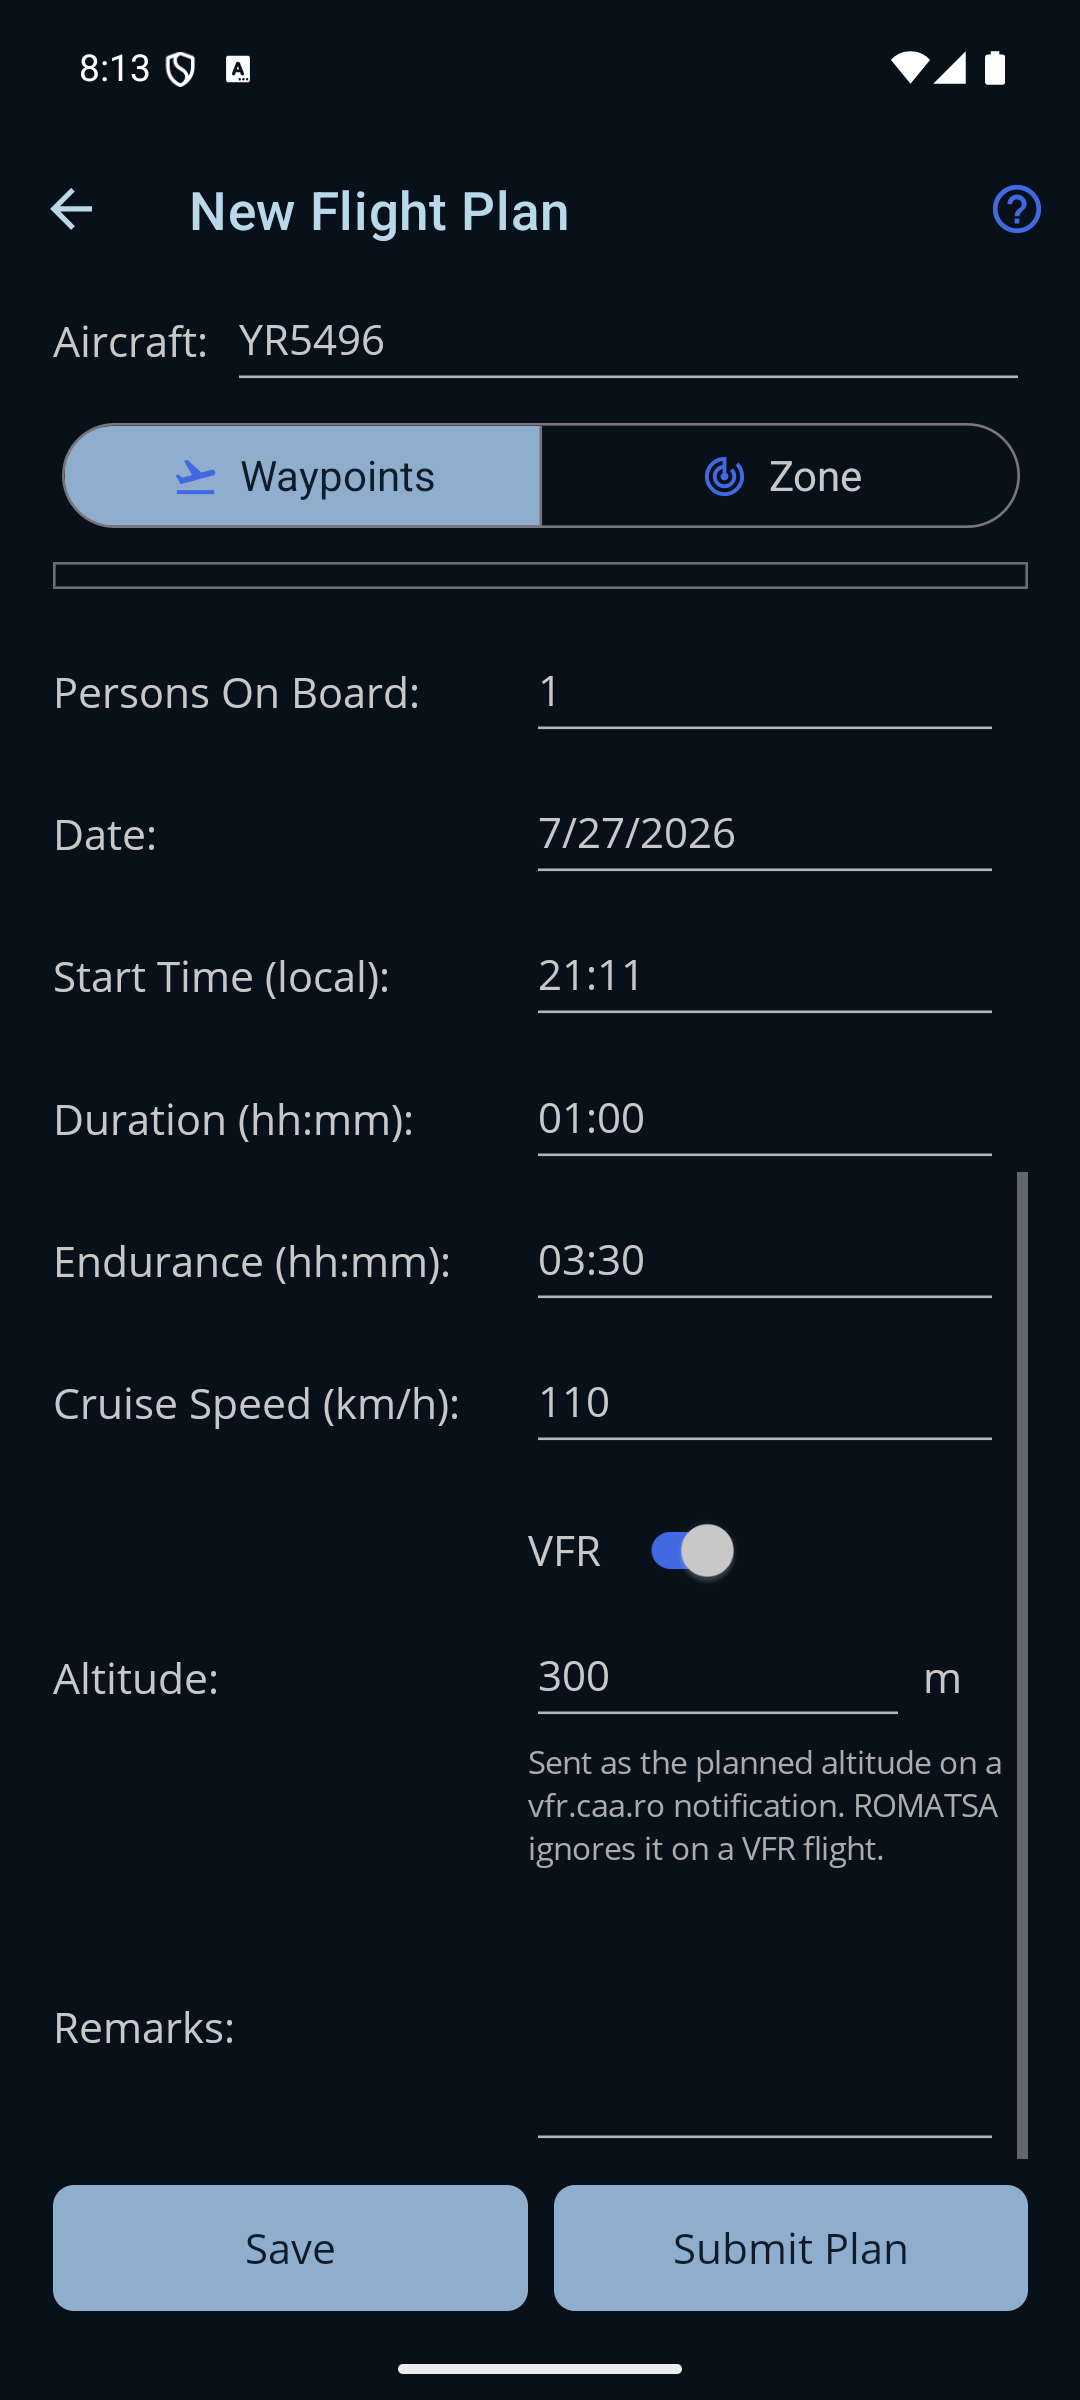
Sunt setări separate, iar ambele moduri le arată pe amândouă. Lasă VFR pornit pentru un zbor VFR obișnuit și scrie totuși altitudinea la care ai de gând să zbori — cele două nu se contrazic:
- Comutatorul VFR hotărăște cum este descris zborul într-un plan de zbor ICAO. Cu el pornit, nivelul este depus ca literele VFR. Dacă îl oprești, se depune un nivel anume, iar atunci fiecare punct de rută își poate purta propriul nivel și propria viteză.
- Căsuța Altitude (în unitatea aleasă de tine, metri sau picioare) este mereu activă și mereu verificată, fiindcă o notificare pe vfr.caa.ro cere o altitudine la fiecare depunere, VFR sau nu. Indiciul de pe ecran o spune: „Sent as the planned altitude on a vfr.caa.ro notification. ROMATSA ignores it on a VFR flight.”
Altitudinea trebuie să fie între 0 și 3 048 m (0–10 000 ft). Dacă iese din interval, apare o notă roșie și ambele butoane rămân dezactivate.
Modul Waypoint
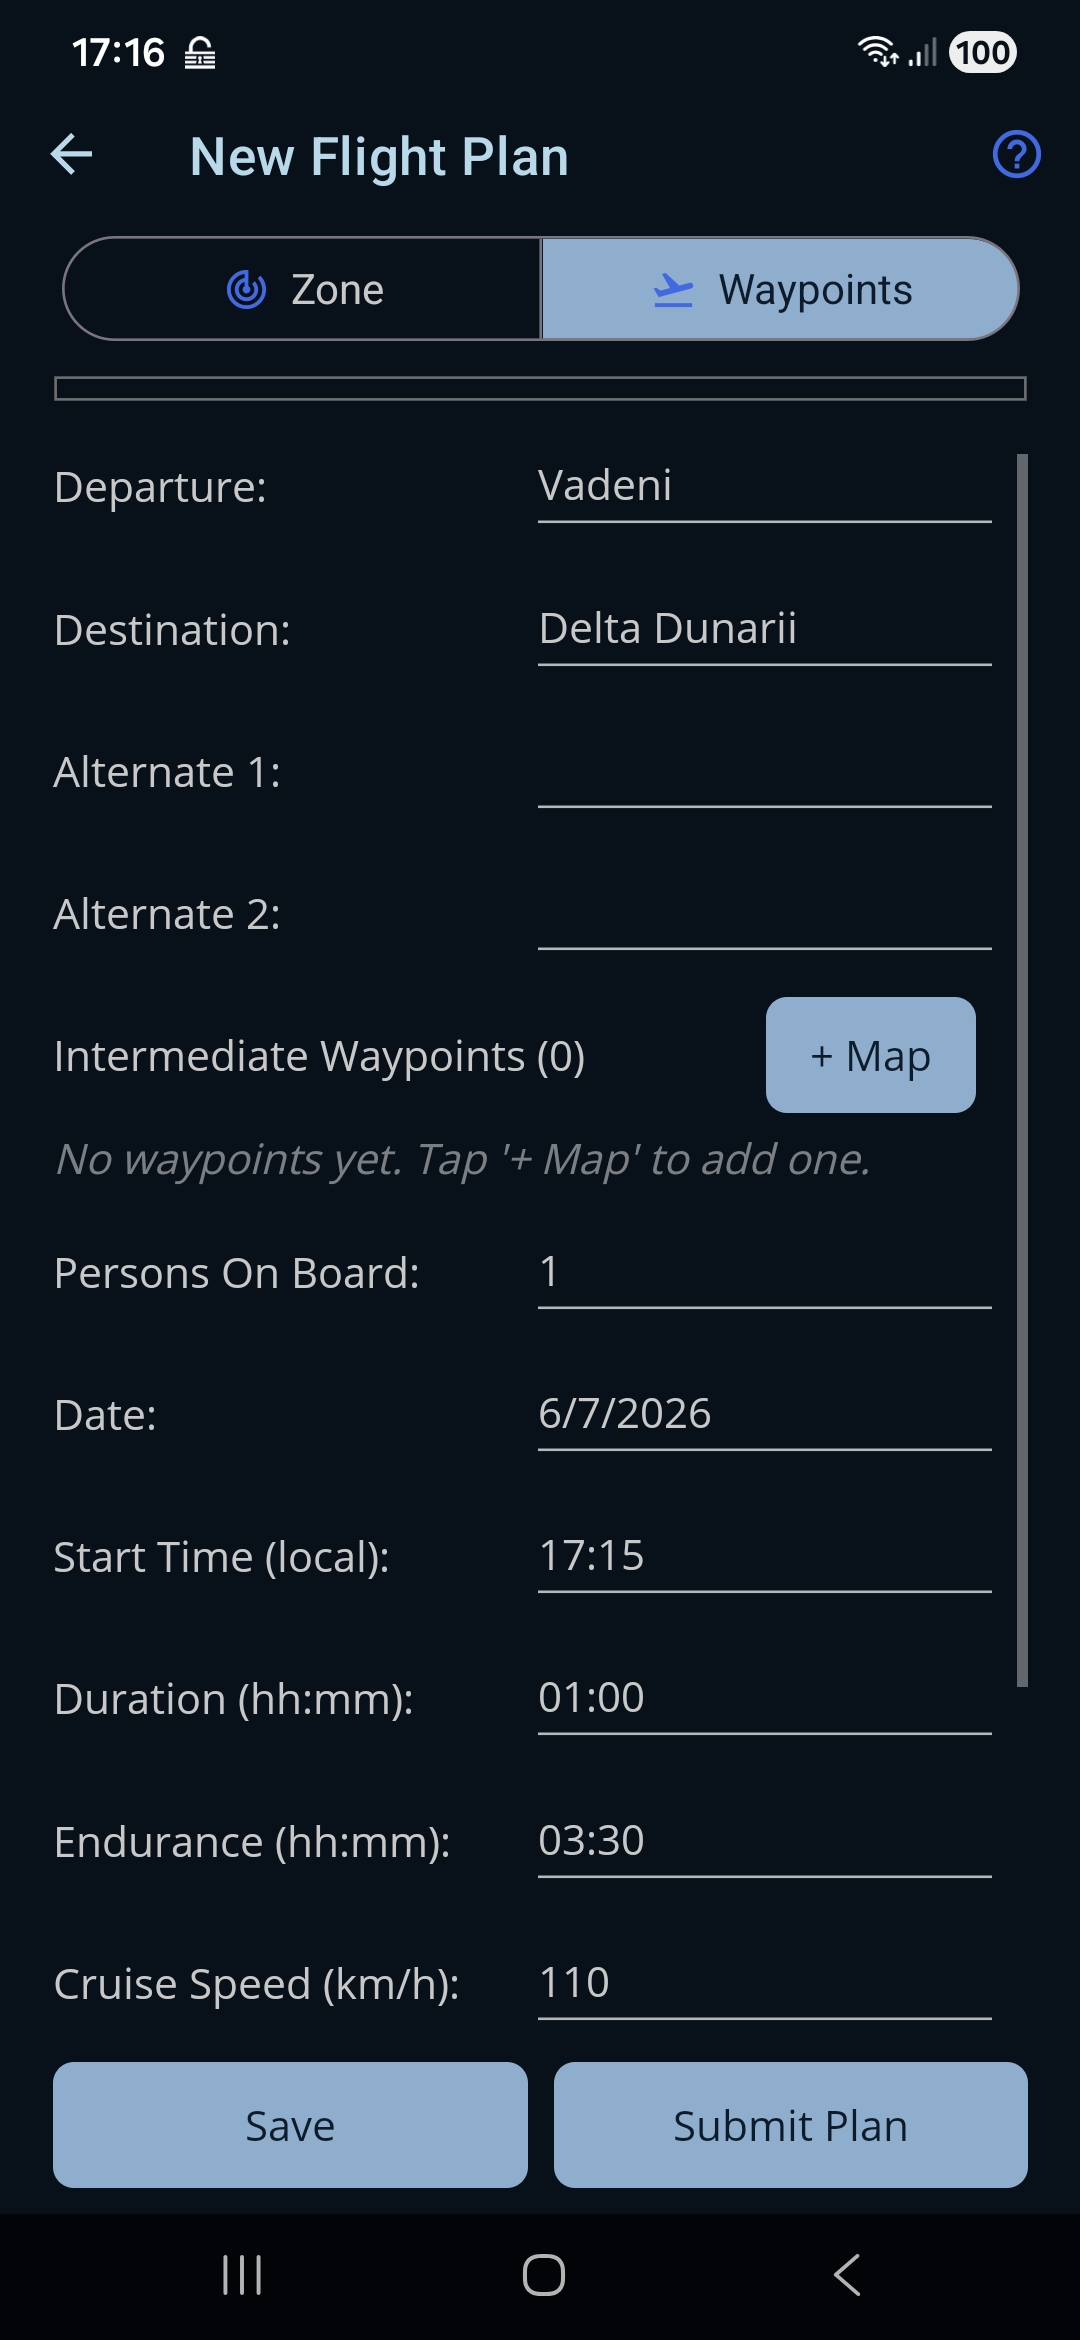
Folosește modul Waypoint pentru o rută între două aerodromuri. Are aceleași câmpuri de zbor ca modul Zone, plus:
- Departure și Destination. Aerodromurile de pe care pleci și pe care ajungi. Amândouă obligatorii.
- Alternate 1 și Alternate 2. Aerodromuri de rezervă, opționale.
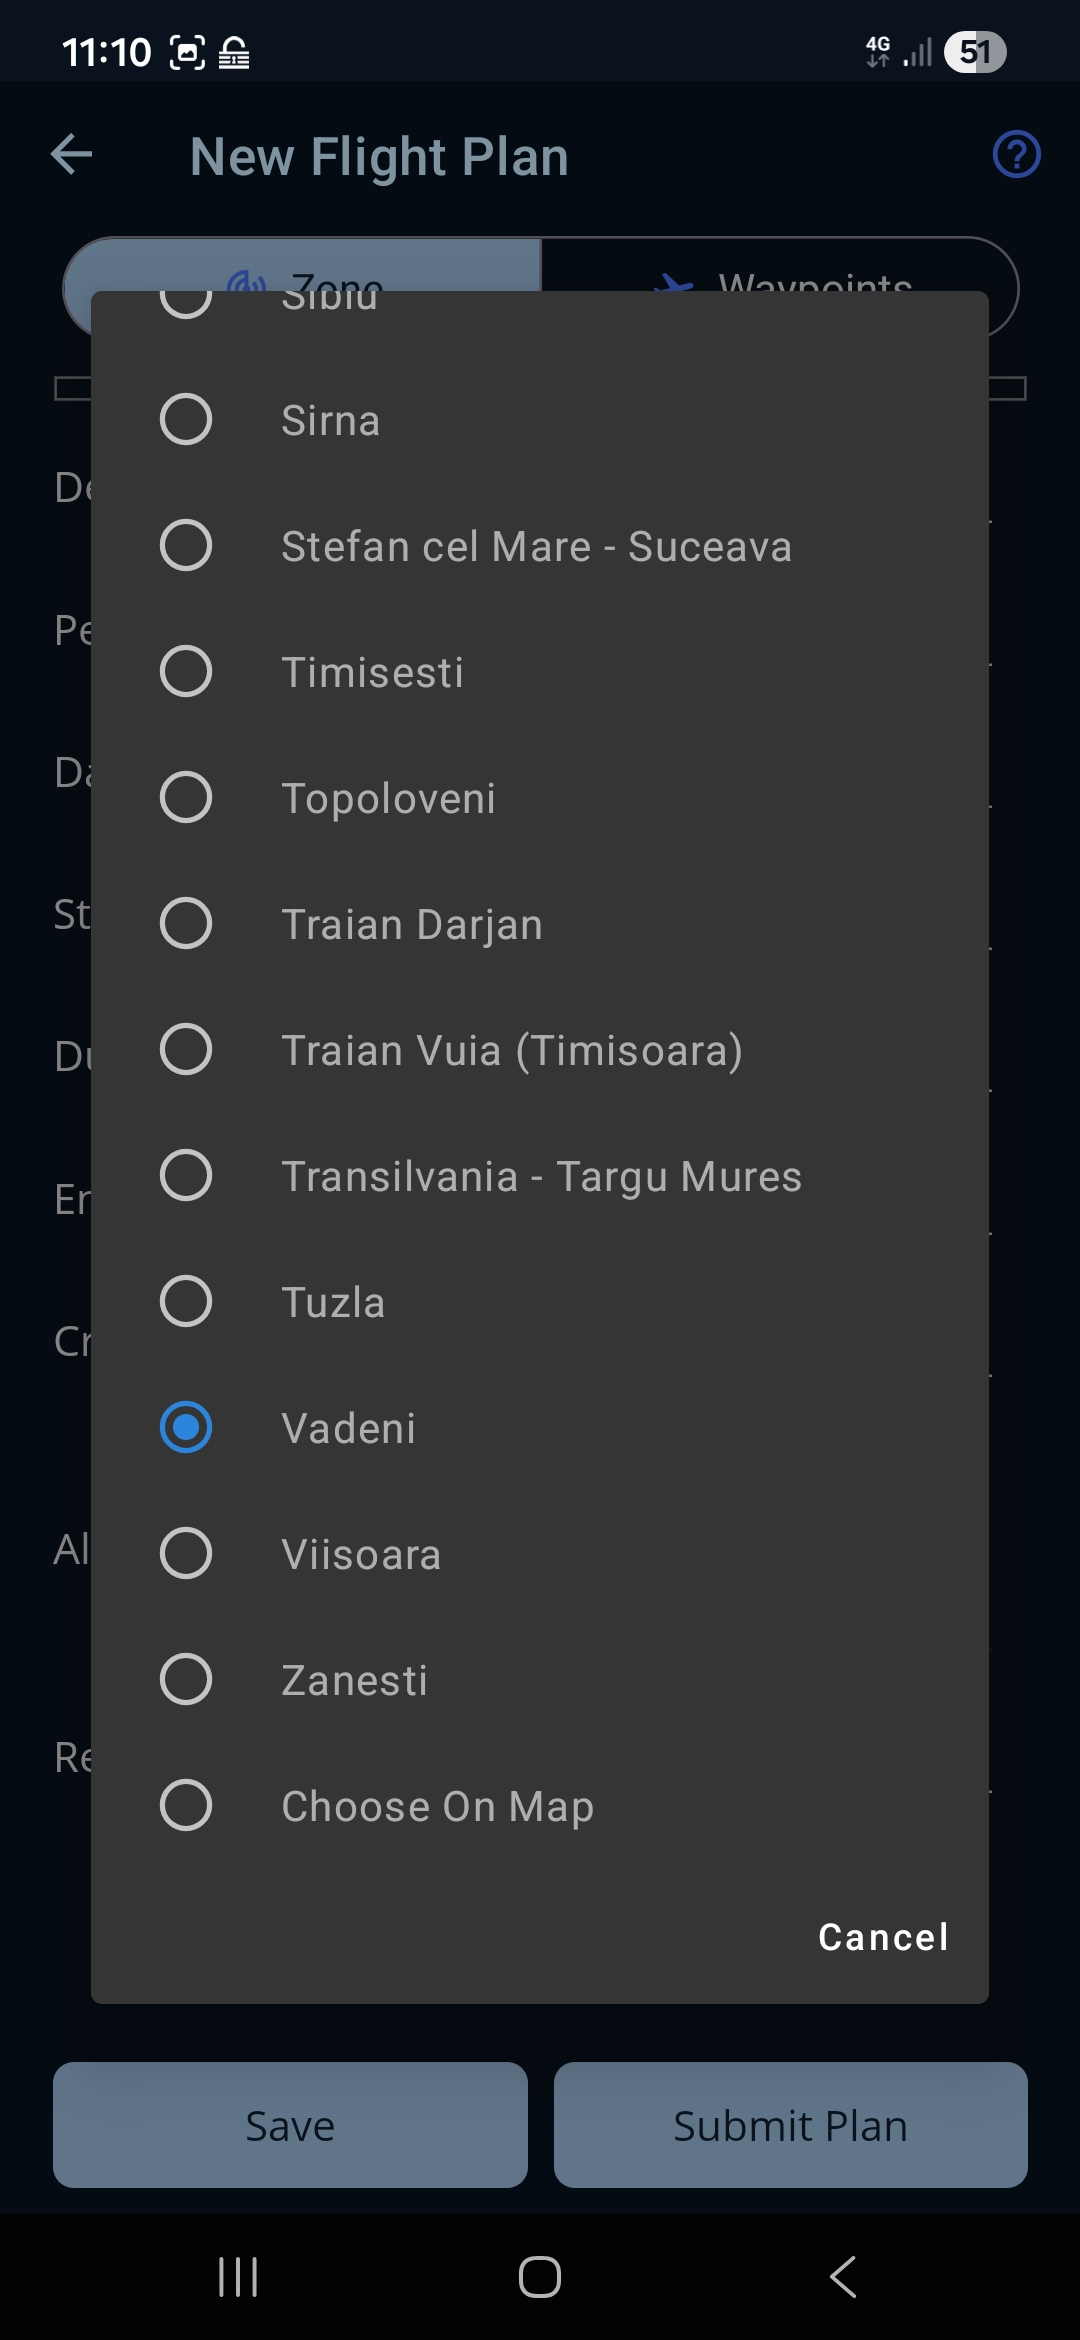
- Cum găsești un aerodrom. Fiecare câmp de aerodrom este o căsuță care filtrează pe măsură ce scrii (text sugerat: „Search airport or ICAO”): începe să scrii un cod ICAO sau un nume și alege dintre potriviri — lista le arată pe amândouă, de exemplu LRBV — Brasov-Ghimbav.
- „Choose On Map”. Fiecare selector de aerodrom (Departure, Destination și ambele Alternate) se termină cu opțiunea Choose On Map. Alege-o când locul de care ai nevoie nu este în lista din aplicație — apoi îl vei poziționa tu pe hartă (vezi Salvarea și depunerea mai jos și pagina Route Map).
- Intermediate Waypoints. O listă cu punctele de pe rută, cu un antet care arată câte ai. Apasă + Map ca să adaugi puncte — asta deschide harta de construit rute (vezi mai jos), nu o fereastră. Fiecare rând de punct îi arată numele și coordonatele, cu butoanele Edit și Remove. Când lista este goală, scrie „No waypoints yet. Tap '+ Map' to add one.”
Cum adaugi puncte pe hartă
Dacă apeși + Map, ajungi la harta de construit rute, unde pui câte puncte vrei, apăsând pe hartă, apoi apeși Finish Plan ca să te întorci aici cu ele completate. (Trebuie să ai deja alese plecarea și destinația.) Vezi pagina Route Map pentru toate comenzile hărții.
Înapoi în formular, butonul Edit al unui punct existent deschide o fereastră mică, unde îi schimbi numele (iar la zborurile care nu sunt VFR, altitudinea și viteza); Remove îl scoate din rută.
Zbor în formație
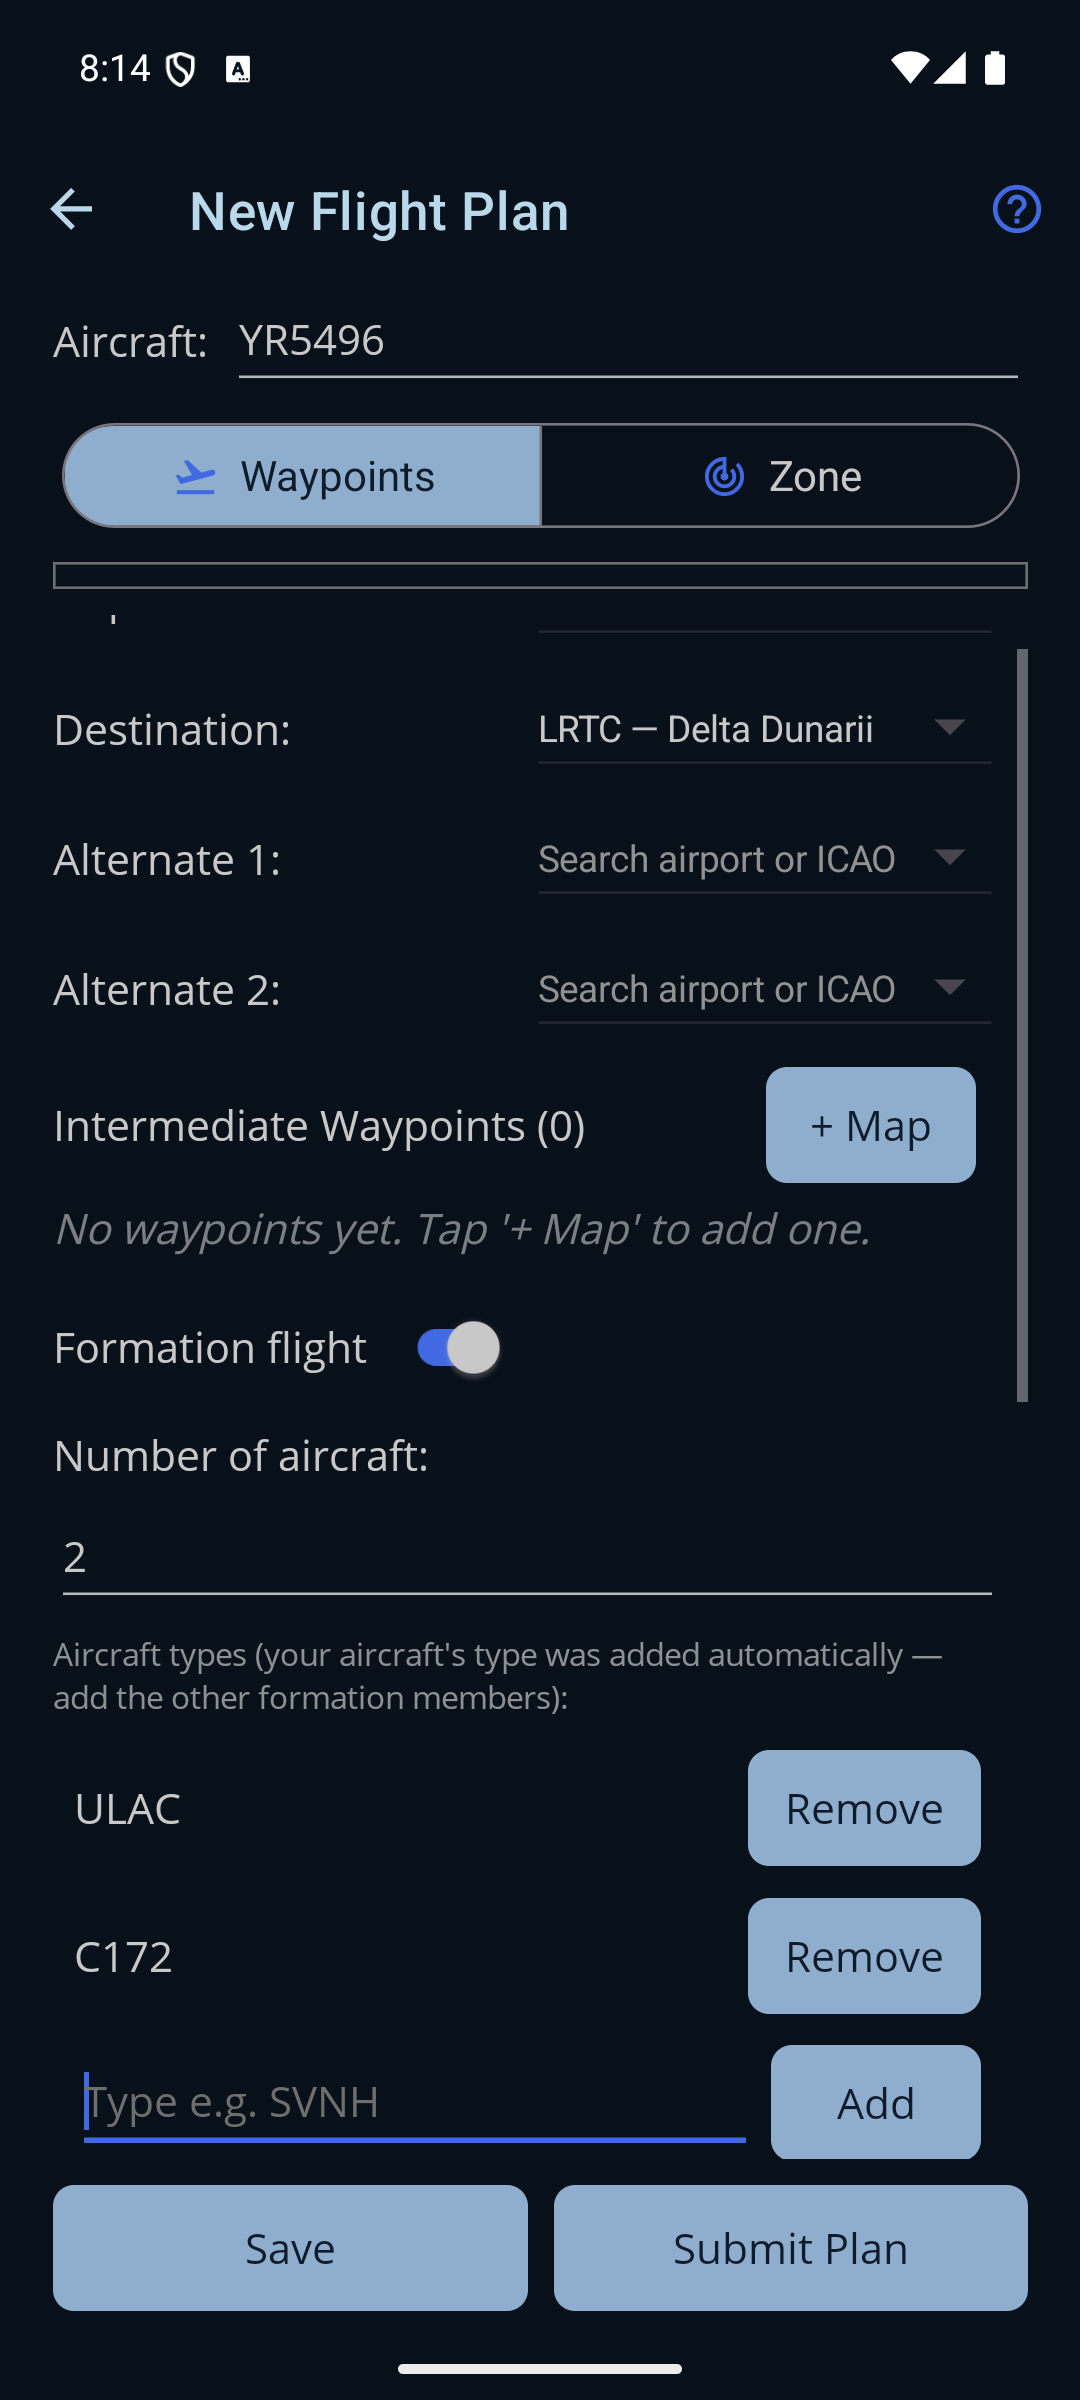
Sub lista de puncte — numai în modul Waypoint — un comutator Formation flight declară că zbori în formație, ca planul să poată spune câte aeronave sunt și de ce tipuri.
- Numărul de aeronave. Între 2 și 99. Când pornești comutatorul, se pune pe 2, fiindcă o formație dintr-o singură aeronavă nu este o formație; orice iese din interval arată „Number of aircraft must be between 2 and 99.” și blochează salvarea.
- Tipurile de aeronavă. O listă cu tipurile din formație. Tipul aeronavei tale este adăugat de aplicație când pornești comutatorul — indiciul scrie „Aircraft types (your aircraft's type was added automatically — add the other formation members)”. Scrie fiecare alt membru în căsuță (text sugerat: „Type e.g. SVNH”) și apasă Add; Remove scoate un rând din listă.
- Ce scrii este pus în ordine. Intrările sunt trecute cu majuscule și curățate de tot ce nu este literă sau cifră — așa că
C-172este păstrat caC172— iar un tip care este deja în listă nu se adaugă a doua oară.
Salvarea și depunerea
În josul formularului sunt două butoane:
- Save. Păstrează planul ca ciornă, la care te poți întoarce și pe care o poți schimba mai târziu.
- Submit Plan. Te întreabă la ce autoritate depui, apoi îți arată rezumatul acelei autorități, cu ce urmează să se trimită, și depune după ce accepți.
Ambele butoane cer un formular corect. Depunerea cere, în plus, un cont verificat la autoritatea pe care o alegi — pregătește-le întâi în pagina Pilot Profile.
Planurile noi au ora de plecare pusă implicit cam peste o oră, iar depunerea cere să fie cu cel puțin o oră în viitor — dacă nu este, ajustează Date / Start Time înainte să depui.
Alegerea locului unde depui
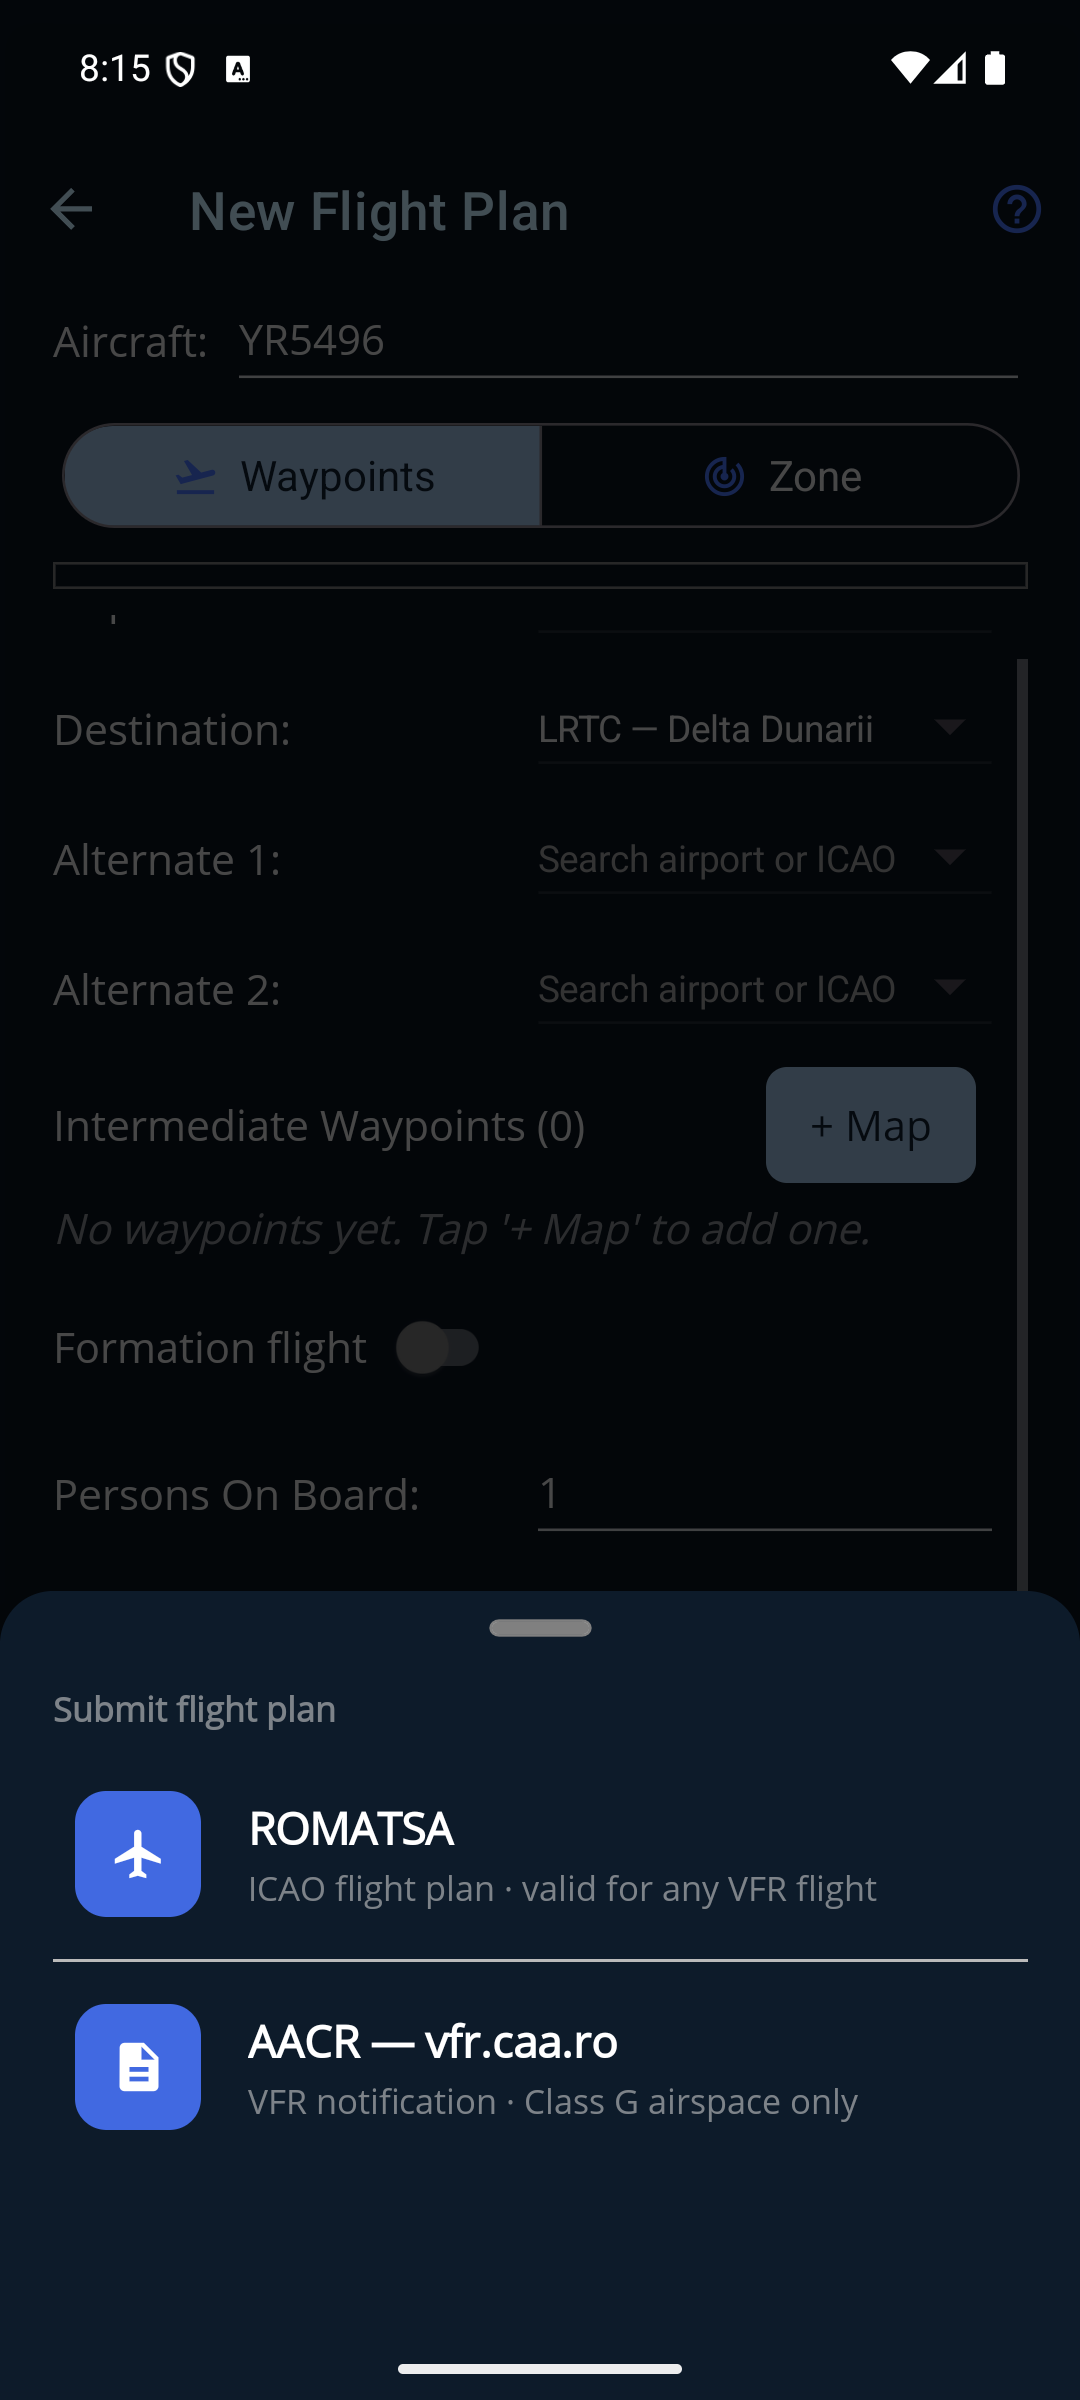
Dacă apeși Submit Plan, se deschide de jos o fereastră „Submit flight plan”, cu cele două canale pe ea:
- ROMATSA — „ICAO flight plan · valid for any VFR flight”. Planul de zbor ICAO obișnuit, depus prin flightplan.romatsa.ro. Este legal pentru orice zbor VFR, de aceea este pus primul.
- AACR — vfr.caa.ro — „VFR notification · Class G airspace only”. O notificare VFR depusă la Autoritatea Aeronautică Civilă Română, prin vfr.caa.ro. Nu este un plan de zbor ICAO și este valabilă numai pentru un zbor desfășurat în întregime în spațiu aerian clasa G — a hotărî dacă zborul tău se încadrează este treaba ta.
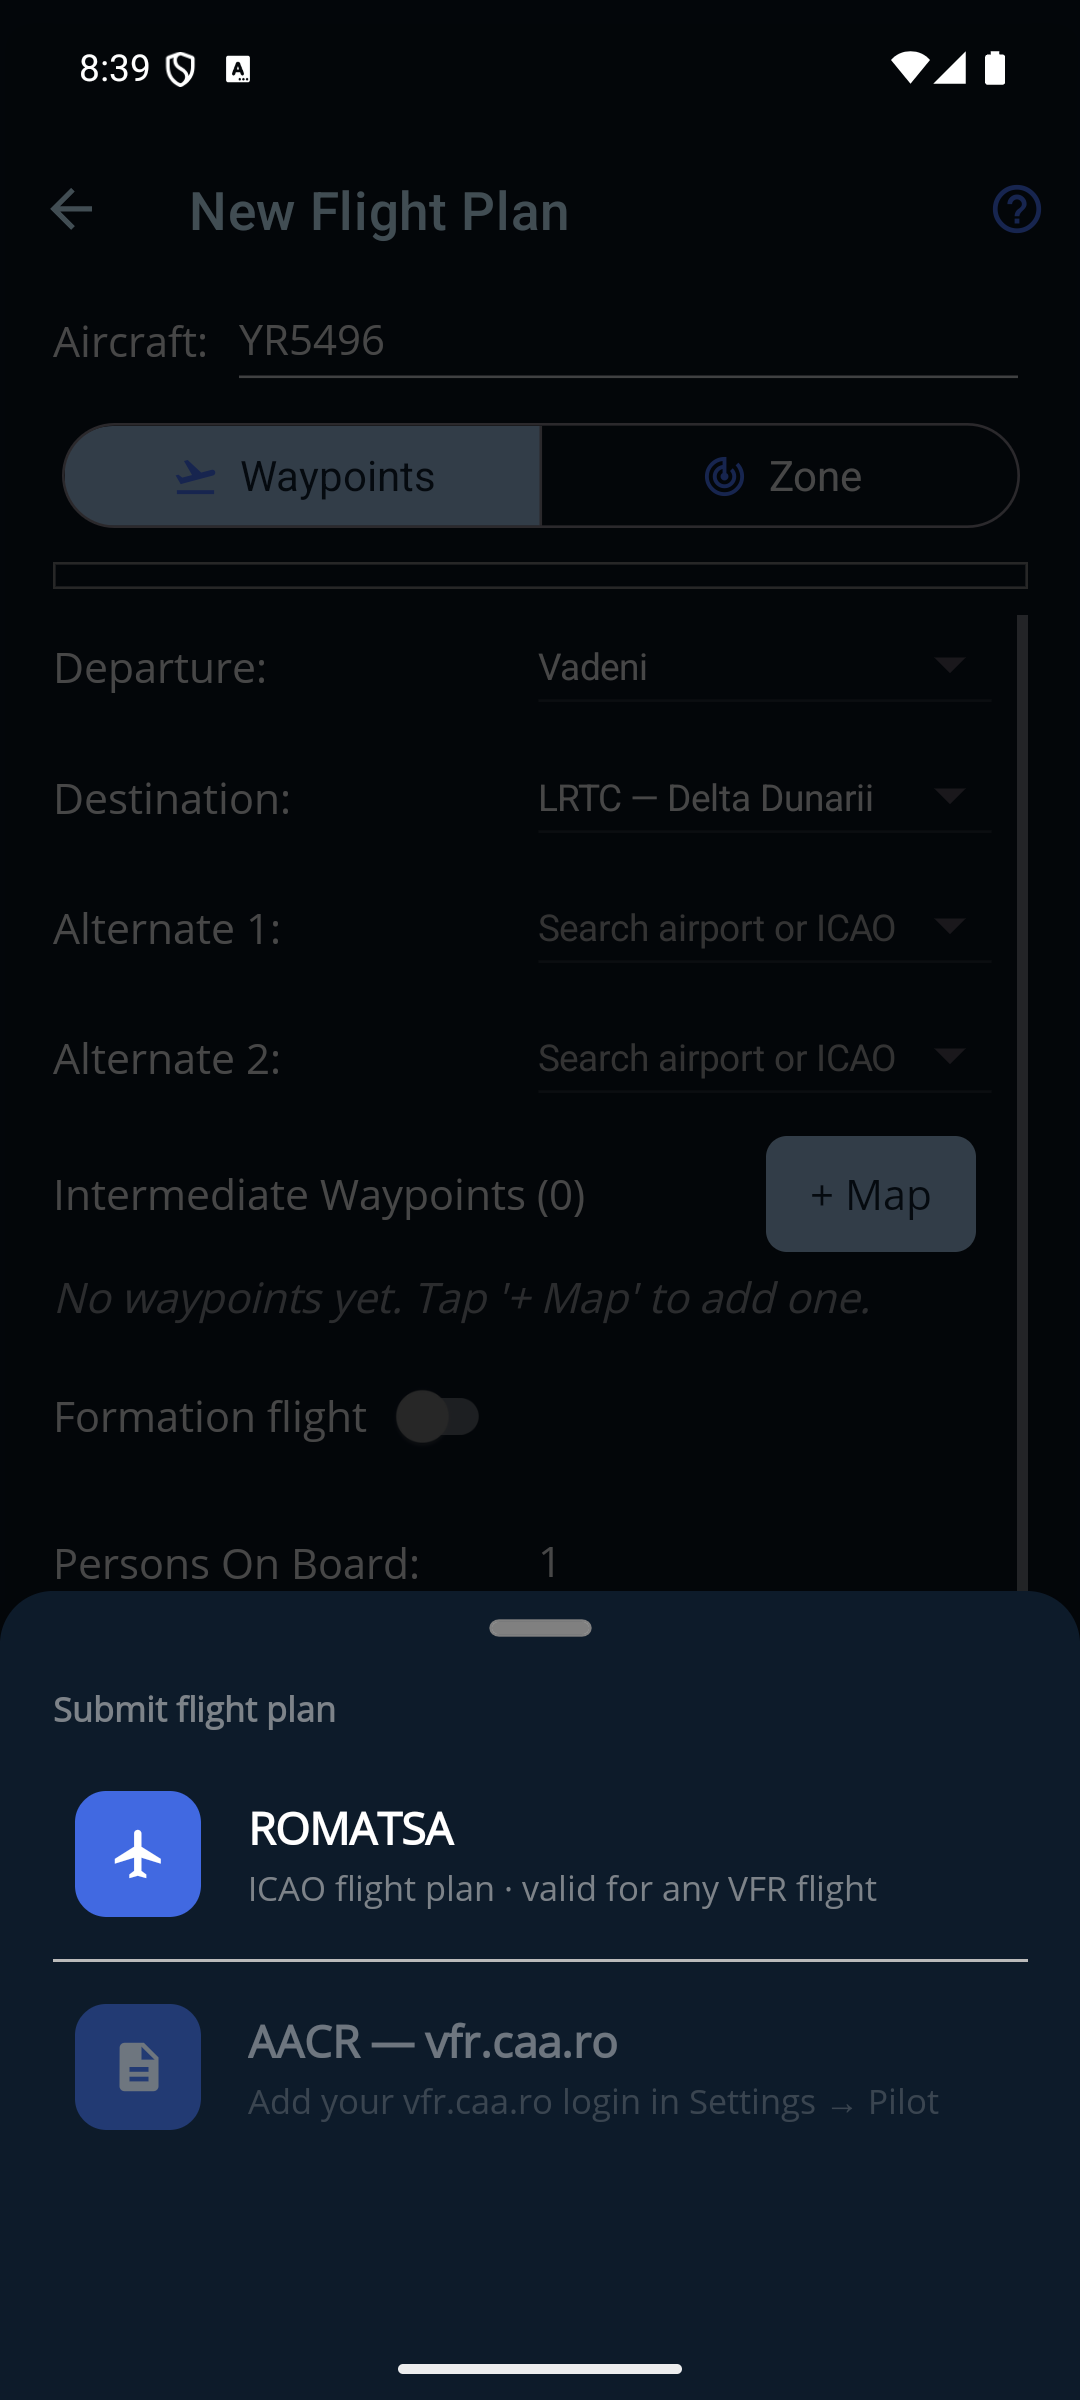
Ambele rânduri se văd întotdeauna. Un canal al cărui cont nu l-ai verificat încă apare estompat și nu răspunde, iar rândul lui scrie „Add your ROMATSA login in Settings → Pilot” (sau „Add your vfr.caa.ro login…”), ca să vezi că acel canal există și ce îi lipsește. Trage fereastra în jos sau apasă în afara ei ca să te retragi — nu se depune nimic până nu apeși un rând.
Confirmarea și ce se întâmplă după
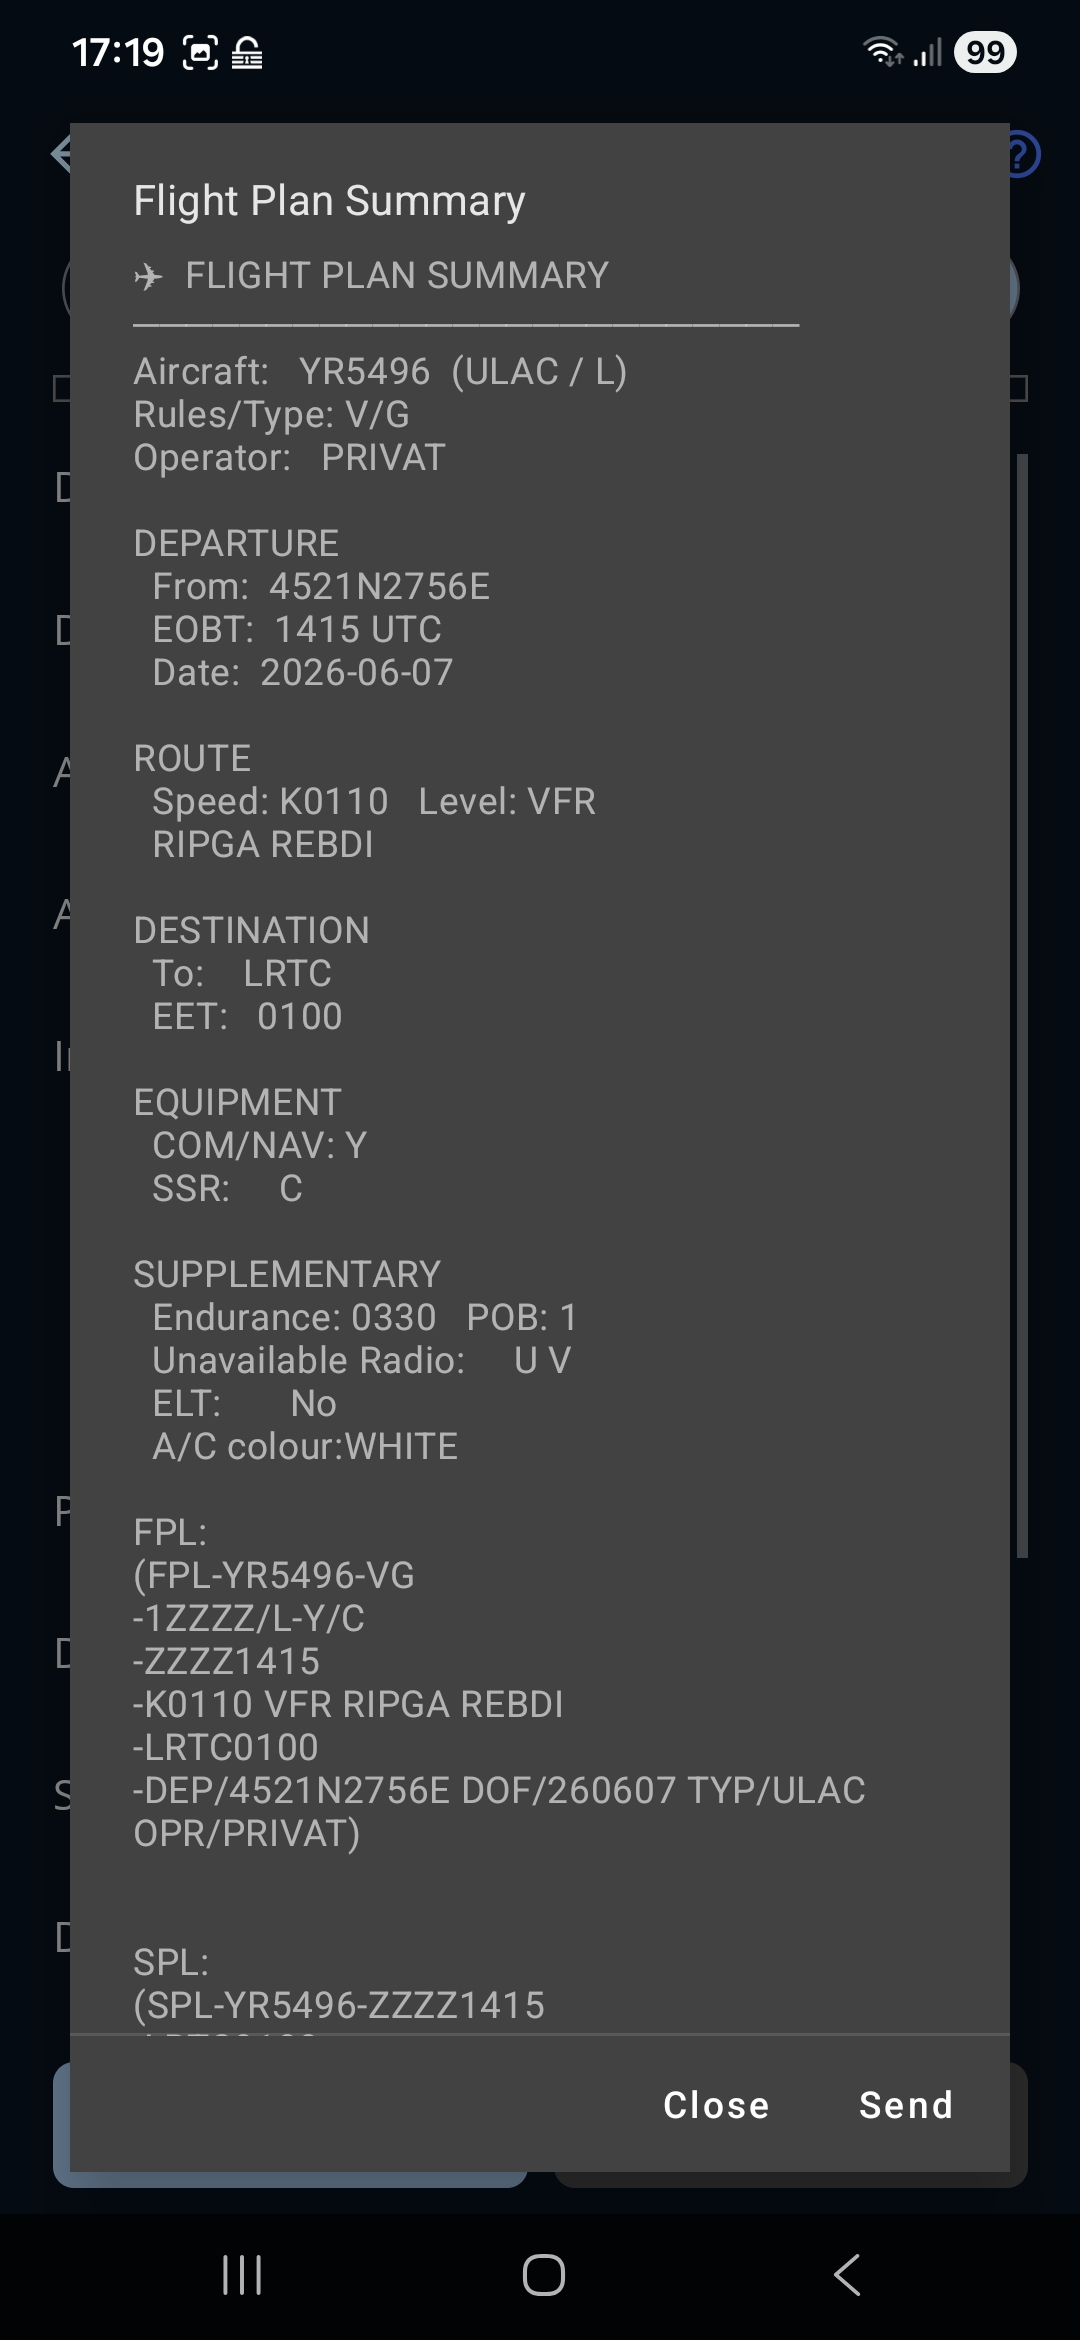
Oricare canal ai alege, aplicația îți arată exact ce urmează să trimită și așteaptă să apeși Send. Cele două arată diferit fiindcă sunt documente diferite: un plan de zbor ICAO asamblat, pentru ROMATSA, și un rezumat de notificare VFR în cuvinte simple, pentru AACR, care îți repune în față restricția de clasa G înainte să te hotărăști.
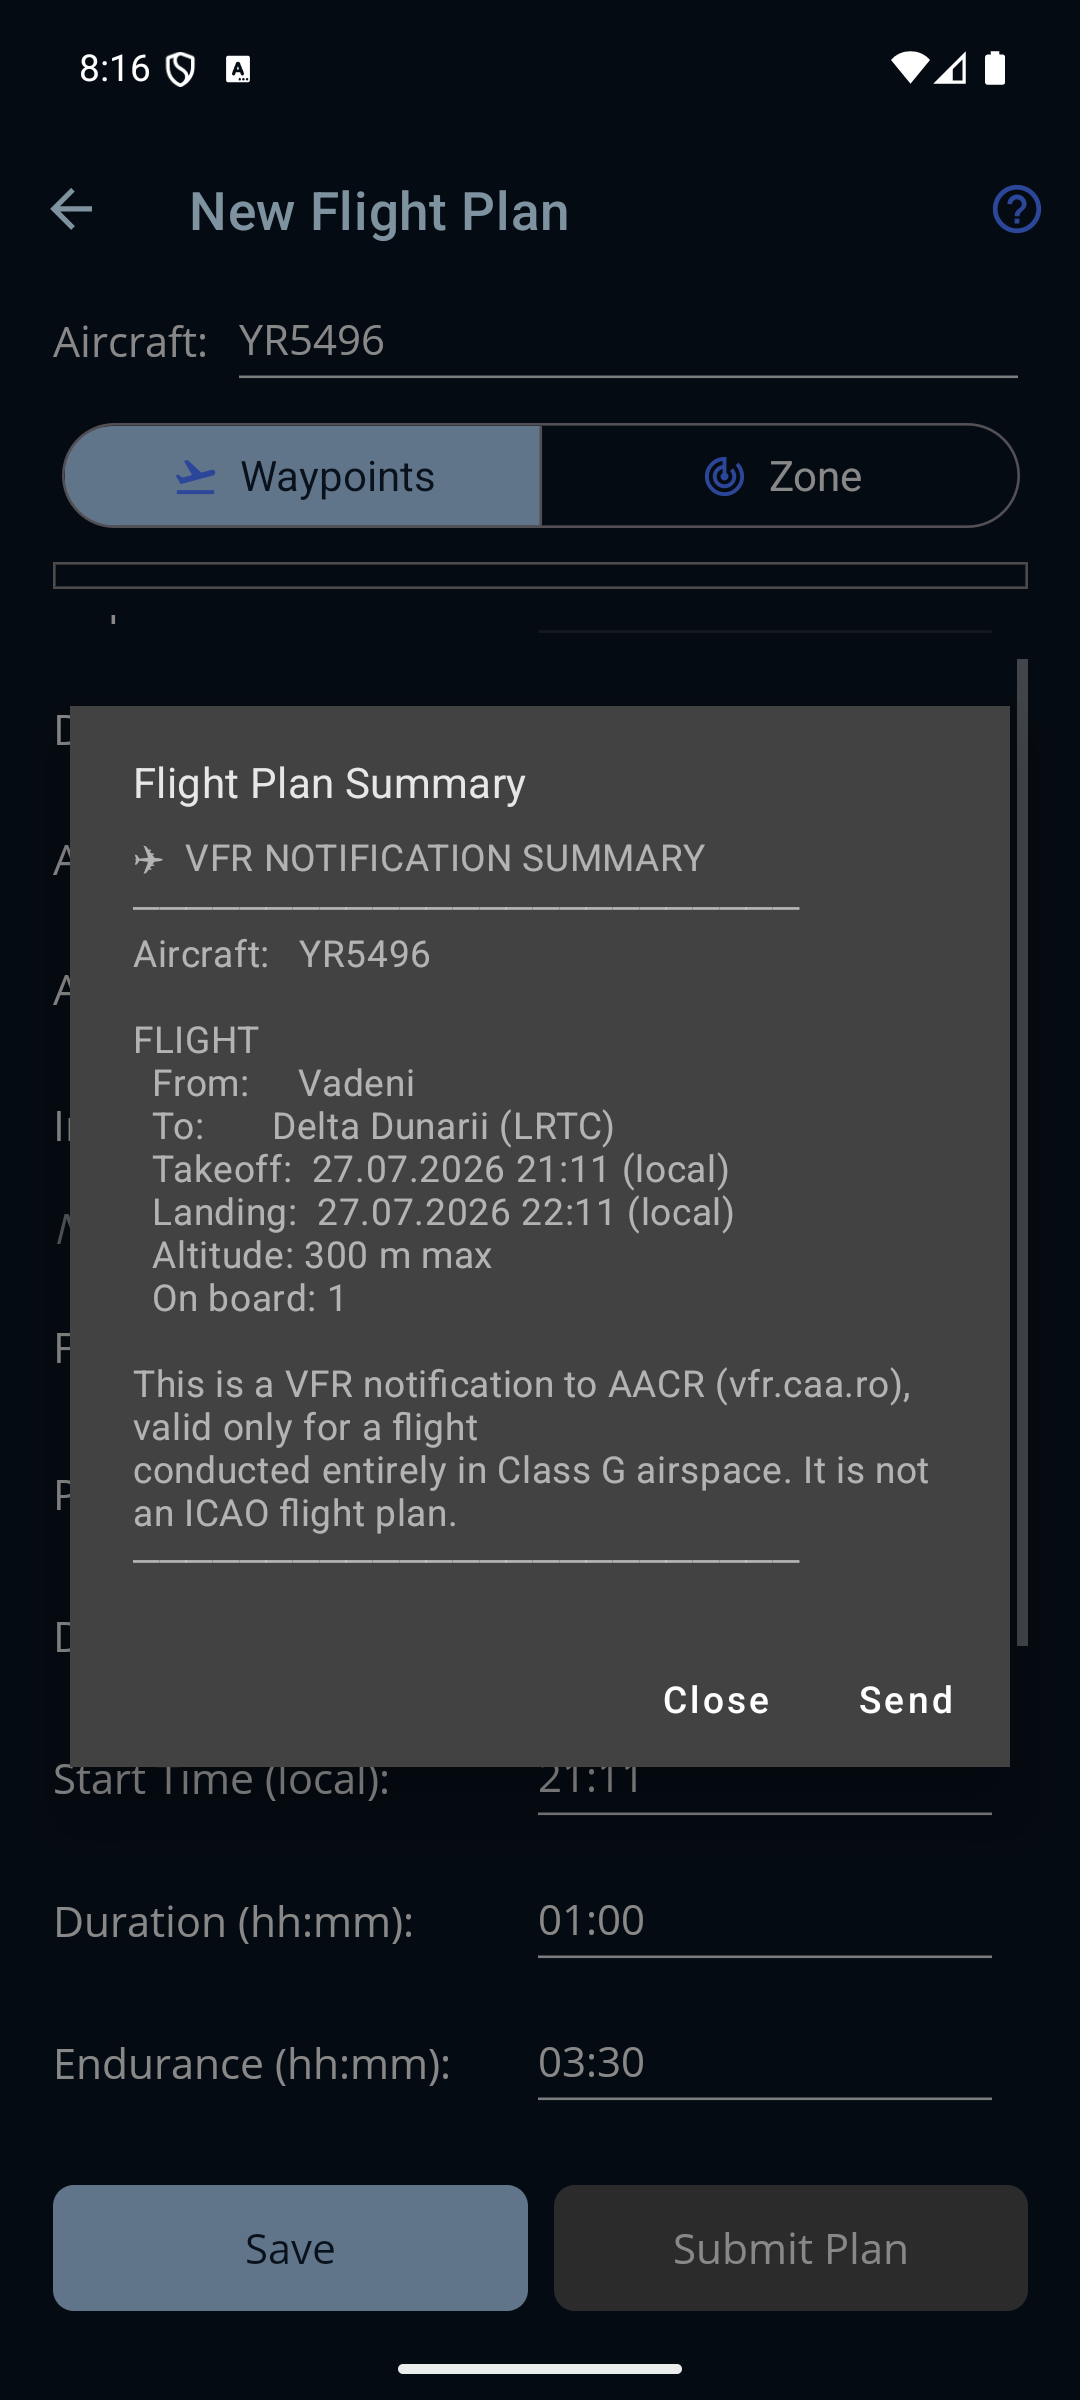
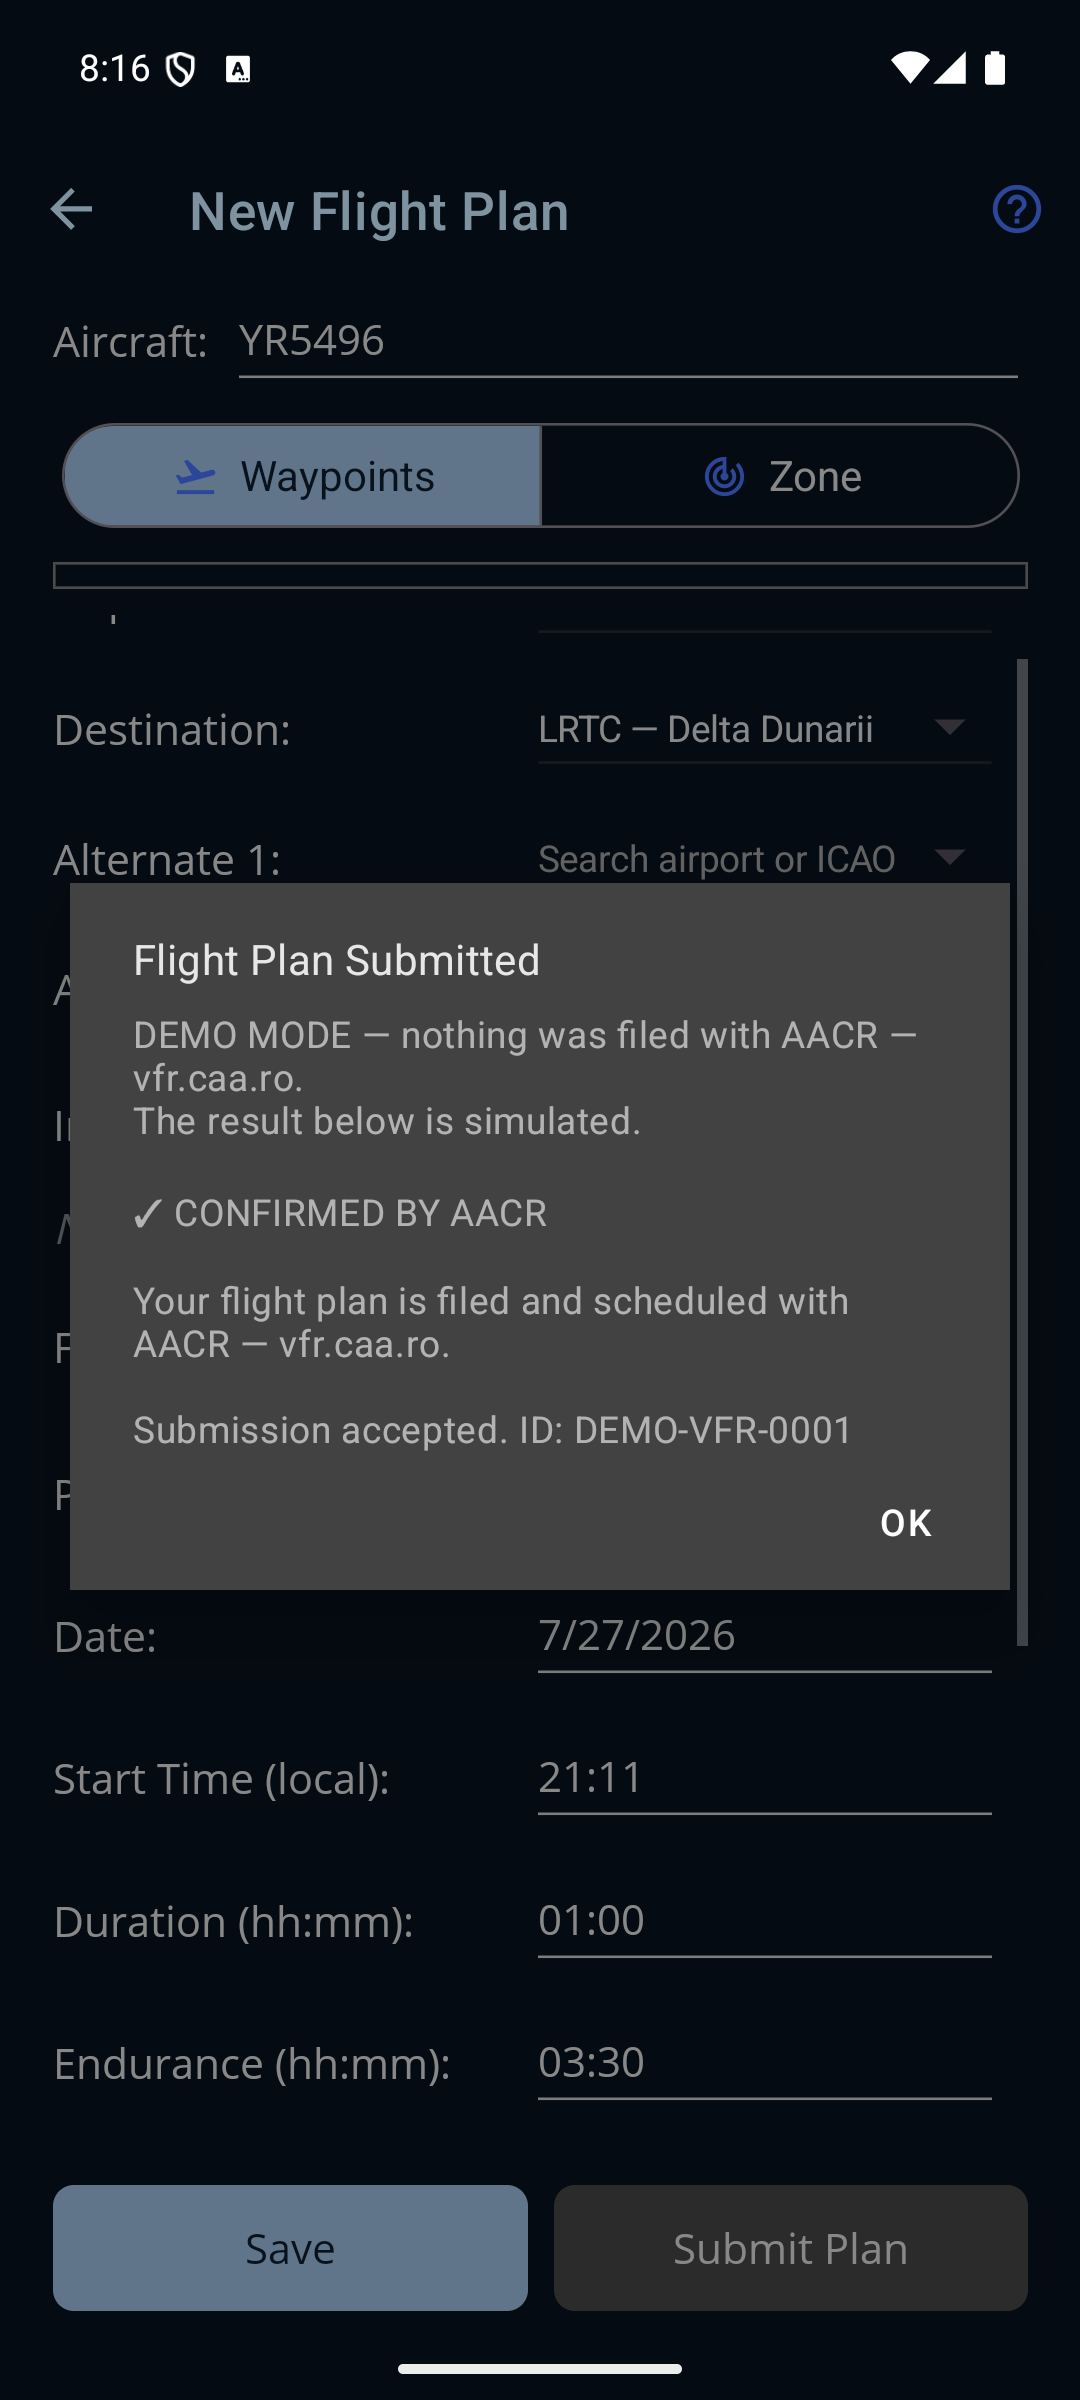
Dacă a mers, starea planului devine Submitted, iar o notificare îți spune ce a zis autoritatea. Sunt trei răspunsuri posibile:
- ✓ CONFIRMED BY … — aplicația a căutat planul în sistemul autorității imediat după depunere și l-a găsit. Nu mai ai nimic de făcut.
- ⚠ ACCEPTED BUT NOT FOUND — depunerea ta a fost acceptată, dar aplicația nu a găsit planul când a căutat. Verifică tu însuți pe portal înainte să zbori.
- ⚠ EARLY ACCESS — NOT YET CONFIRMED — aplicația nu a putut verifica, deci trebuie să o faci tu. Acesta este întotdeauna răspunsul la ROMATSA, care nu publică nicio stare a depunerii pe care aplicația să o poată citi: confirmă prin confirmarea proprie a ROMATSA (e-mail sau telefon), cum ai făcut mereu.
Dacă aplicația nu poate ajunge la propria ei verificare dinaintea depunerii, depune oricum și adaugă un mesaj „Heads up”, cu numele autorității.
O notă despre capturile de ecran: au fost făcute în modul demo, offline, al
aplicației, așa că, acolo unde o depunere reală ar arăta numărul de referință al autorității,
vei vedea unul de forma DEMO-…, iar deasupra notificării apare un rând
„DEMO MODE — nothing was filed”. În rest, ecranele nu diferă cu nimic.
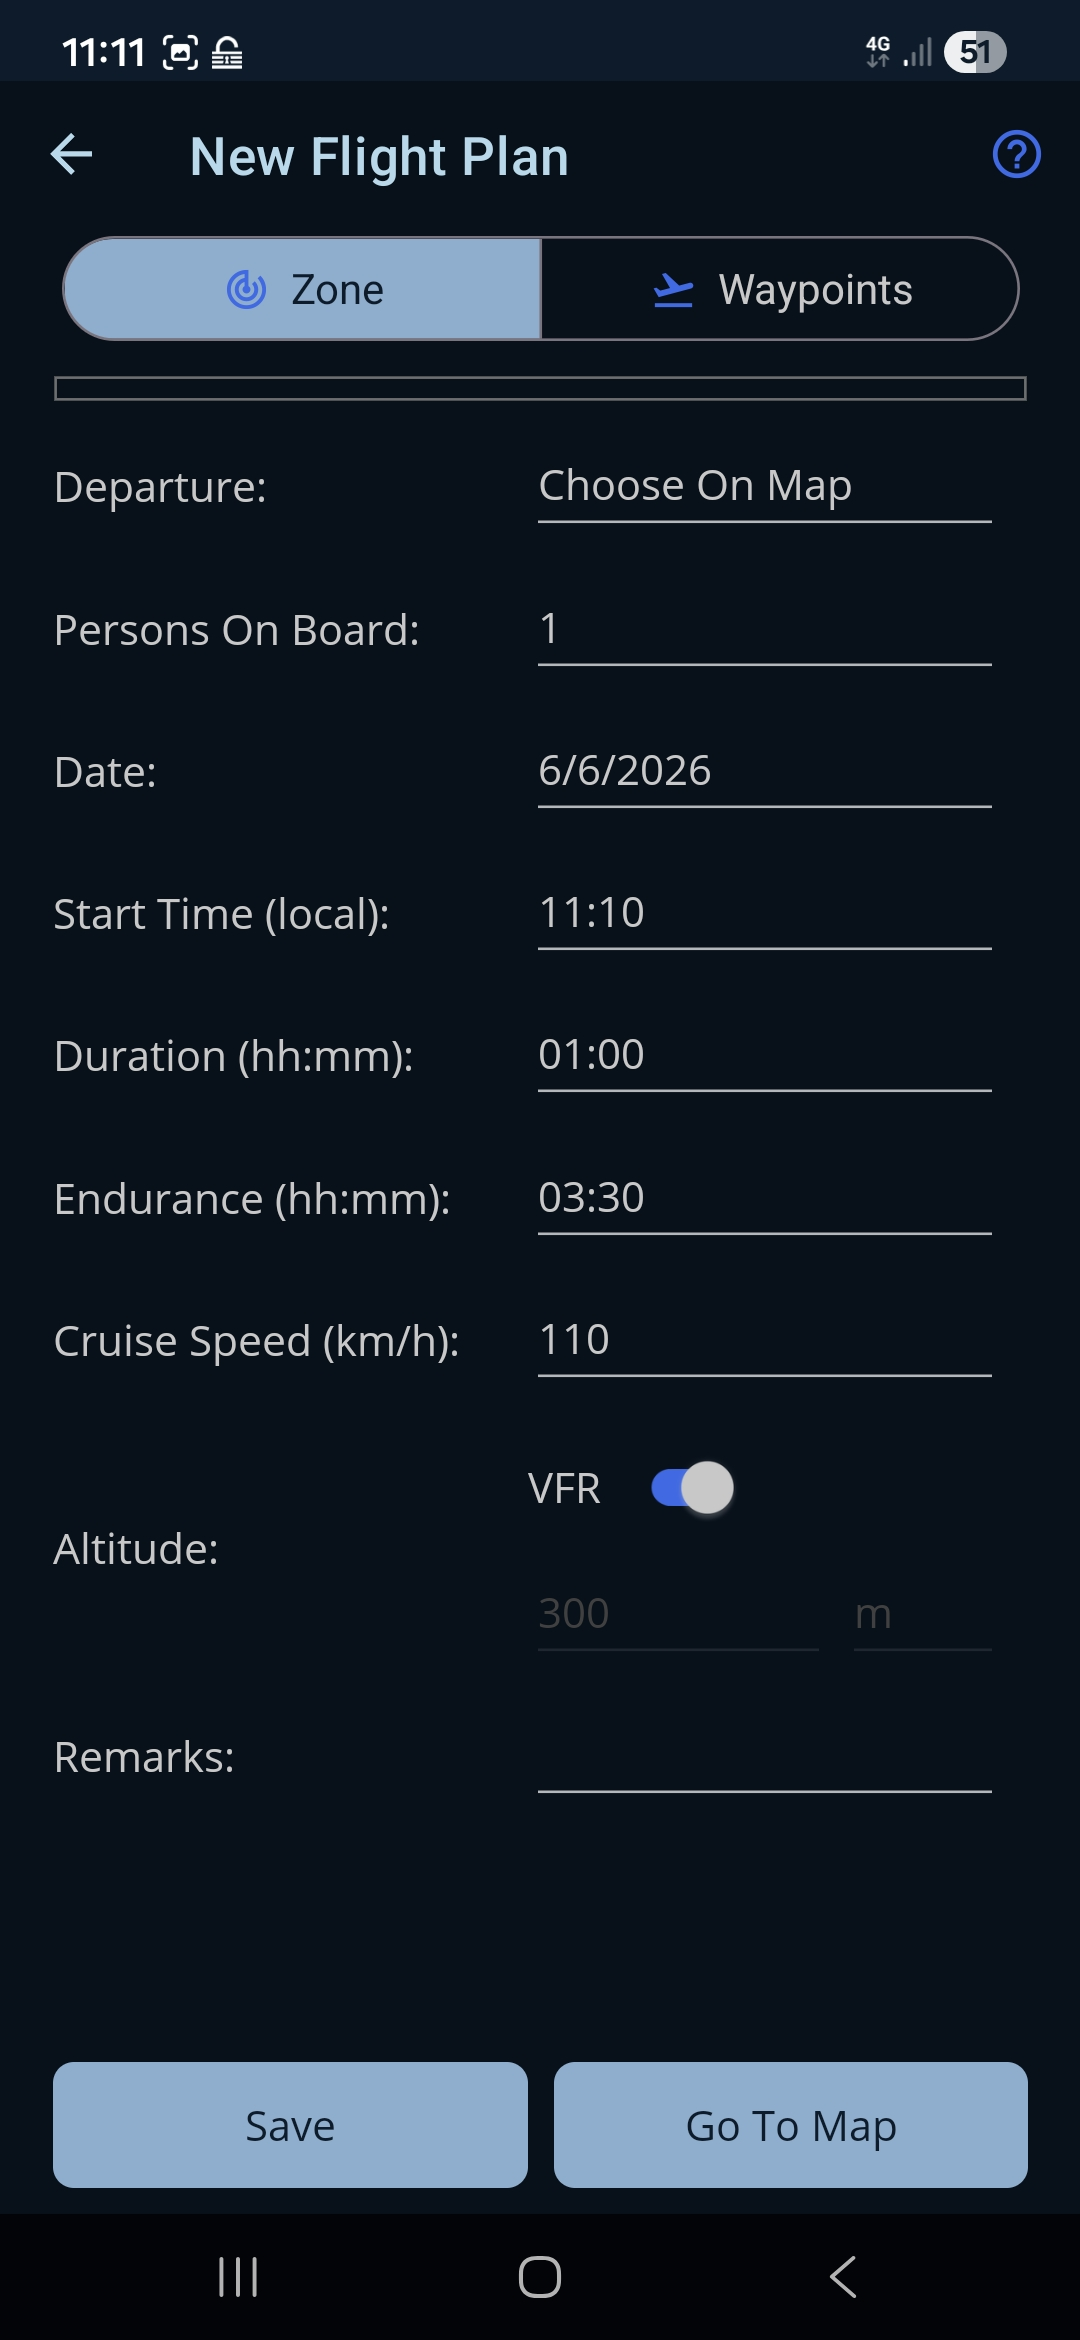
„Go To Map” înainte de depunere
Dacă vreun aerodrom pe care l-ai ales este pus pe Choose On Map și încă nu a fost poziționat, butonul din dreapta scrie Go To Map în loc de Submit Plan. Apasă-l ca să deschizi harta, pune punctul (sau punctele) rămase și apasă Finish Plan — înapoi în formular, butonul devine Submit Plan și poți depune ca de obicei.
← Înapoi la manual · Urmează: Route Map →