Flight Plan Form
Where you create a new flight plan or edit an existing draft. There are two modes: Zone for a simple flight that begins and ends at the same place, and Waypoints for a route between two aerodromes with optional waypoints along the way. At the bottom you can either save a draft or file the plan with the authority of your choice — ROMATSA or AACR.
How to get here: tap + on the Flight Plans list to start a new plan, or tap Edit on a draft's detail page.
Tap the help (?) icon in the top bar to show or hide the on-screen hint.
Choosing the aircraft
The first line of the form is an Aircraft picker listing your saved aircraft profiles. Pick the one you're flying — that becomes the active aircraft used to build the plan (it's the same selection you can make under Settings → Aircraft).
Choosing a mode
Below the aircraft picker, a selector switches between Waypoints and Zone. Pick the mode first, because it changes which fields are shown.
Zone mode
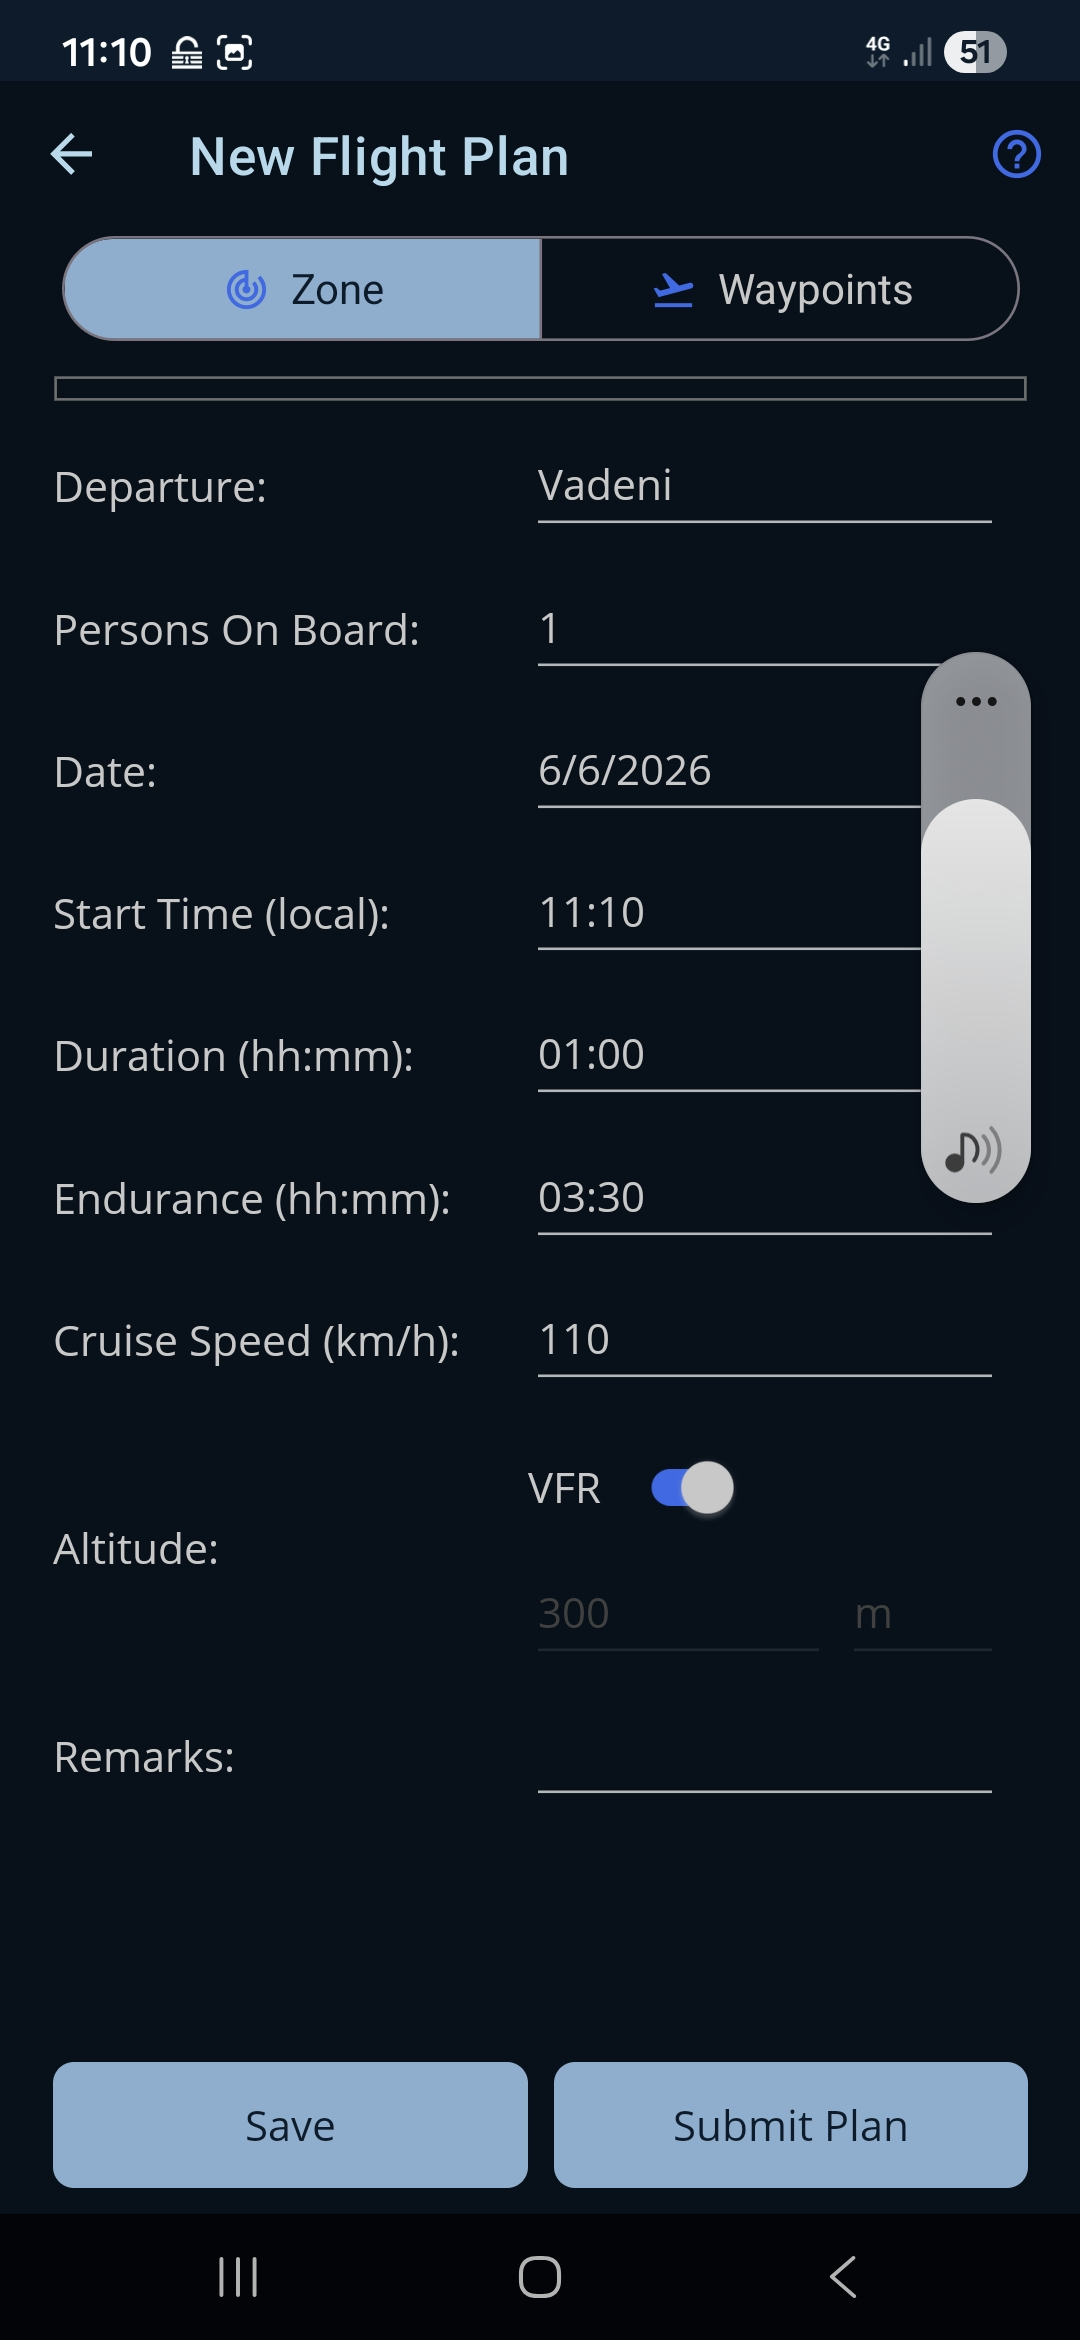
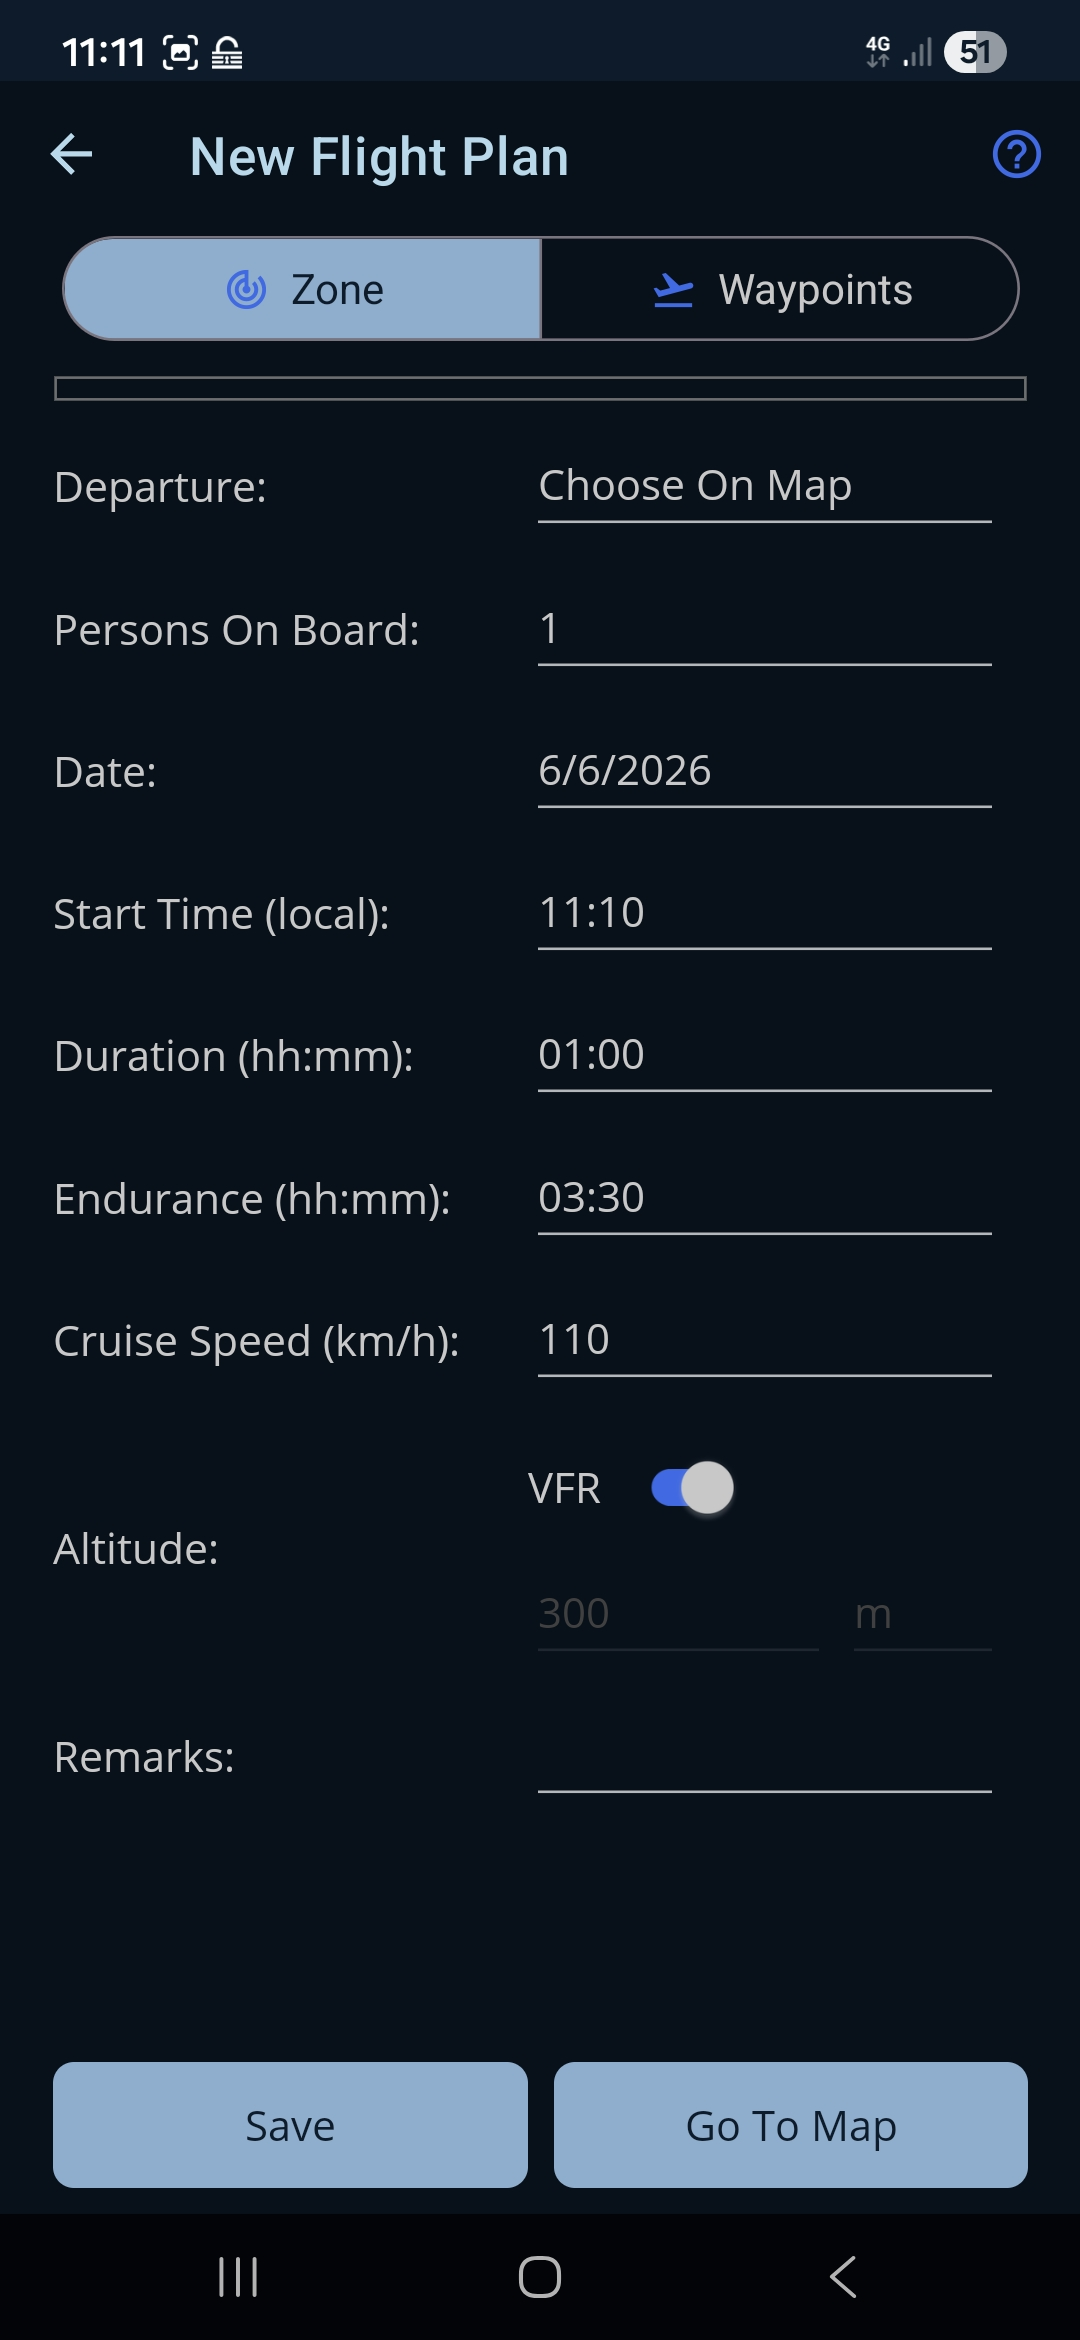
Use Zone mode for activity in one area (departure and destination are the same place). Its fields are:
- Departure. The aerodrome you fly from (and back to). Required.
- Persons On Board. How many people are aboard. Required.
- Date. The date of the flight.
- Start Time (local). Your off-block time in local time.
- Duration (hh:mm). How long you plan to fly.
- Endurance (hh:mm). How long your fuel lasts. Required.
- Cruise Speed. Your cruising speed, in your chosen speed unit (kt or km/h — set under Settings → Pilot → Preferences). Required.
- VFR and Altitude. Two independent controls — see below.
- Remarks. Any free-text notes for the flight plan (multiple lines are allowed). In Zone mode this is pre-filled with the local-area note.
VFR and the cruising altitude
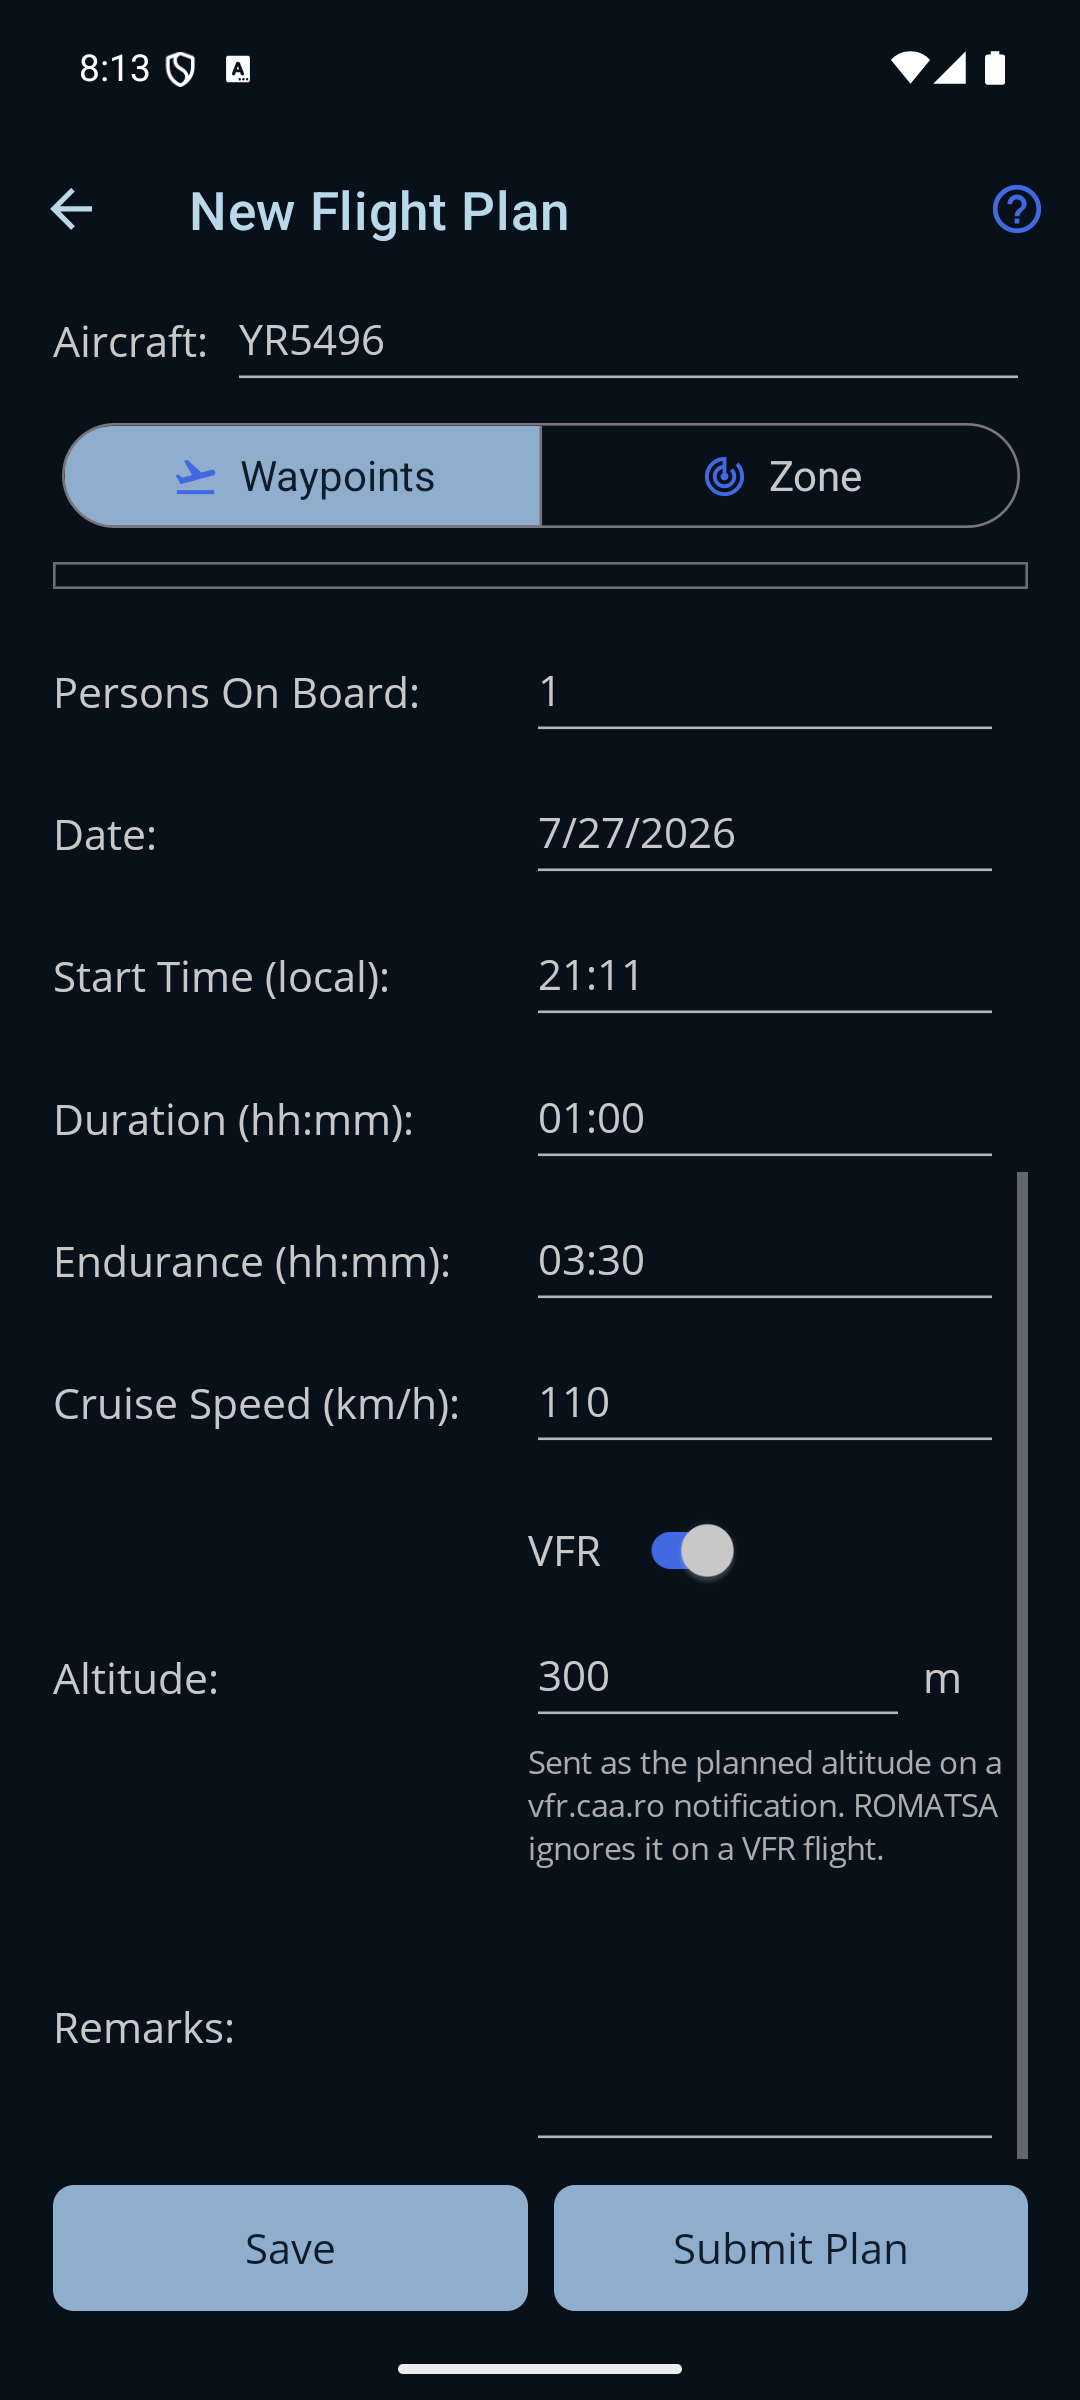
These are separate settings, and both modes show both. Leave VFR on for a normal VFR flight and still enter the Altitude you plan to fly — the two do not contradict each other:
- The VFR switch decides how the flight is described on an ICAO flight plan. With it on, the level is filed as the letters VFR. Turn it off to file a specific level instead, which also lets each waypoint carry its own level and speed.
- The Altitude box (in your chosen unit, metres or feet) is always enabled and always checked, because a vfr.caa.ro notification requires an altitude on every submission, VFR or not. The on-screen hint says so: “Sent as the planned altitude on a vfr.caa.ro notification. ROMATSA ignores it on a VFR flight.”
The altitude must be between 0 and 3 048 m (0–10 000 ft). If it's outside that, a red note appears and both buttons stay disabled.
Waypoint mode
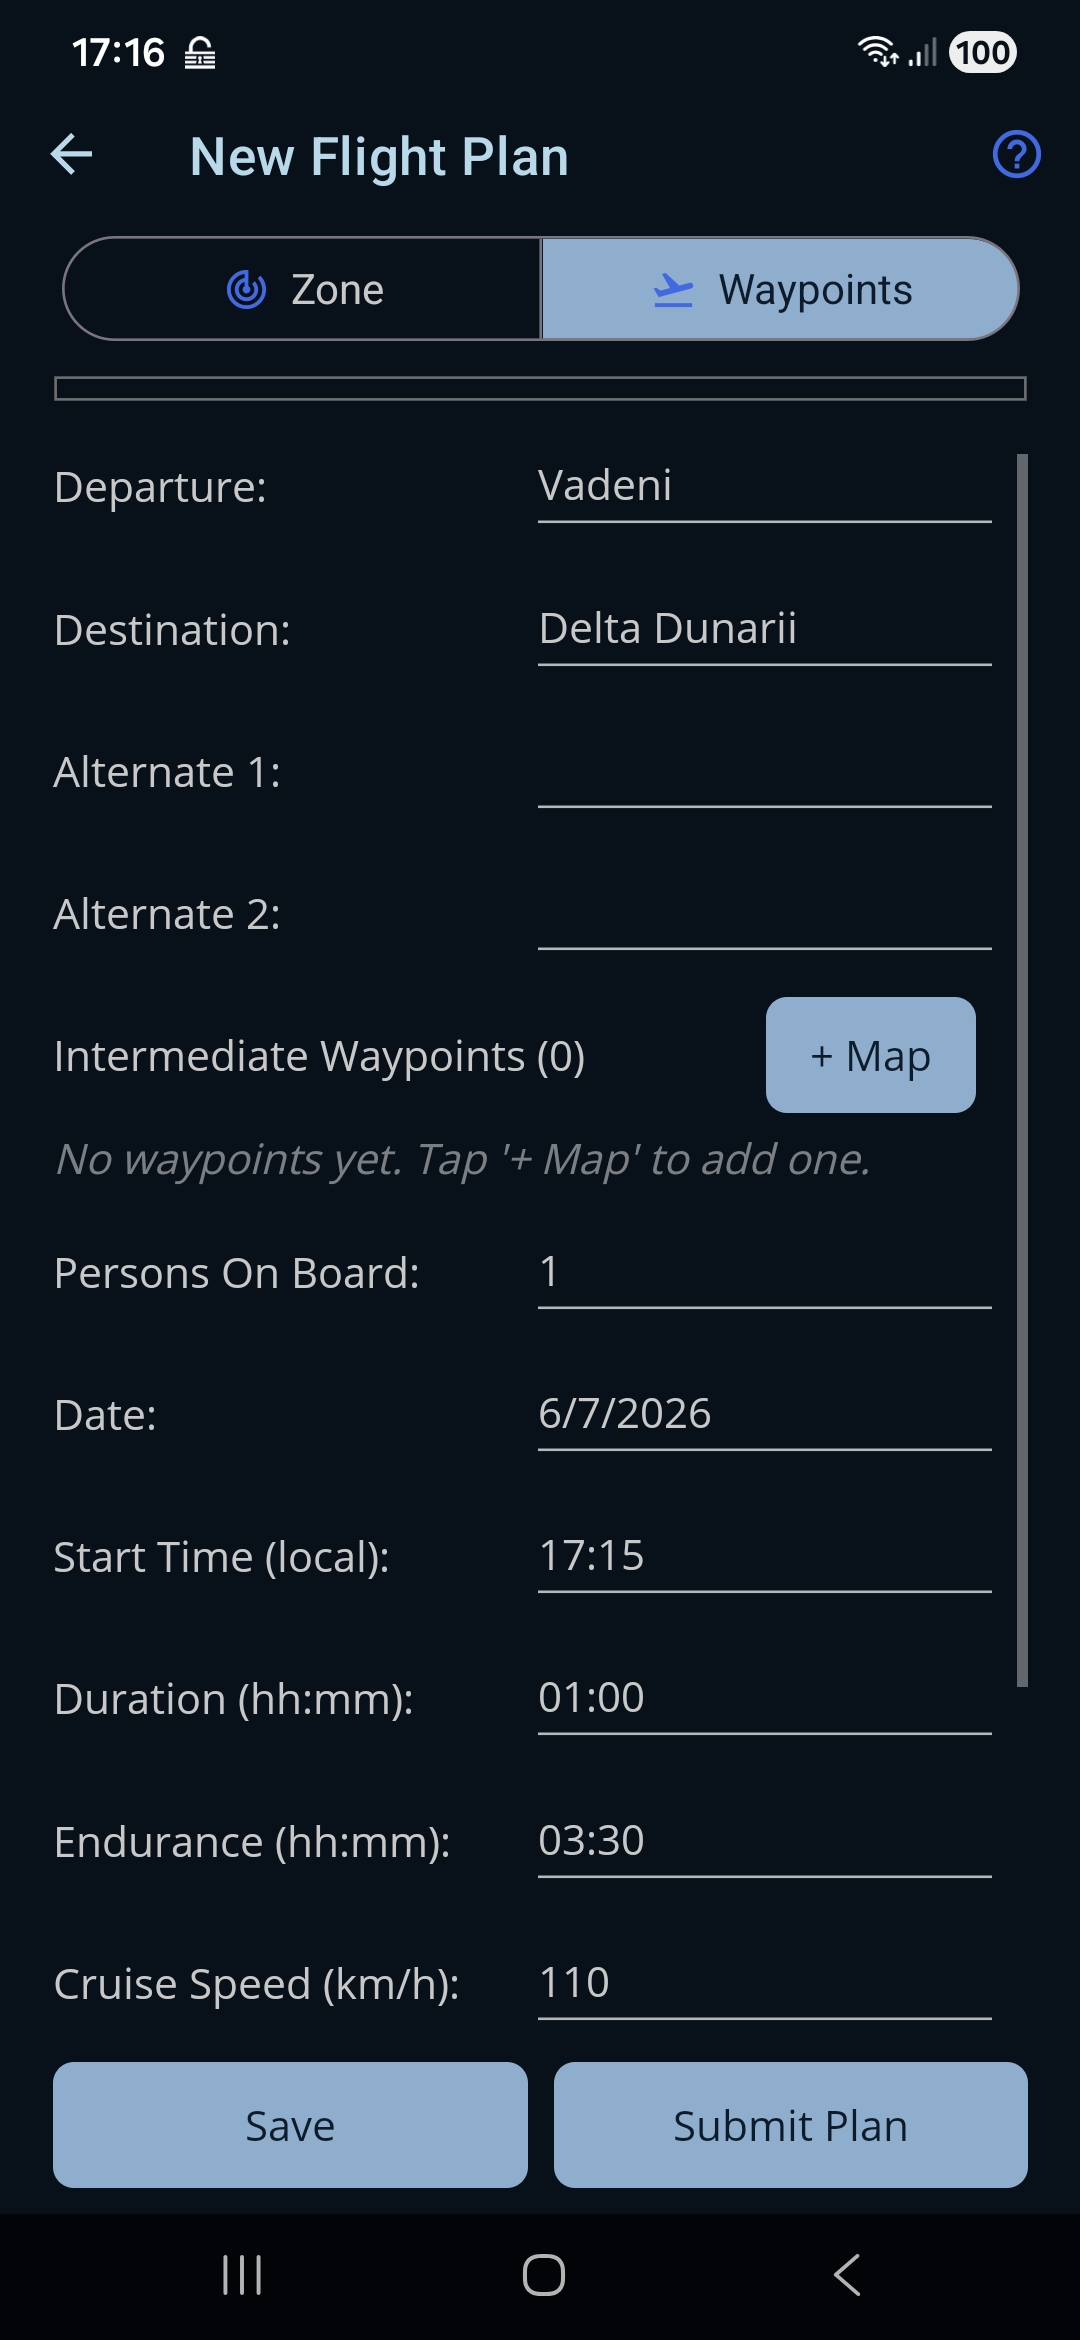
Use Waypoint mode for a route between two aerodromes. It has all the same flight fields as Zone mode, plus:
- Departure and Destination. The aerodromes you fly from and to. Both required.
- Alternate 1 and Alternate 2. Optional alternate aerodromes.
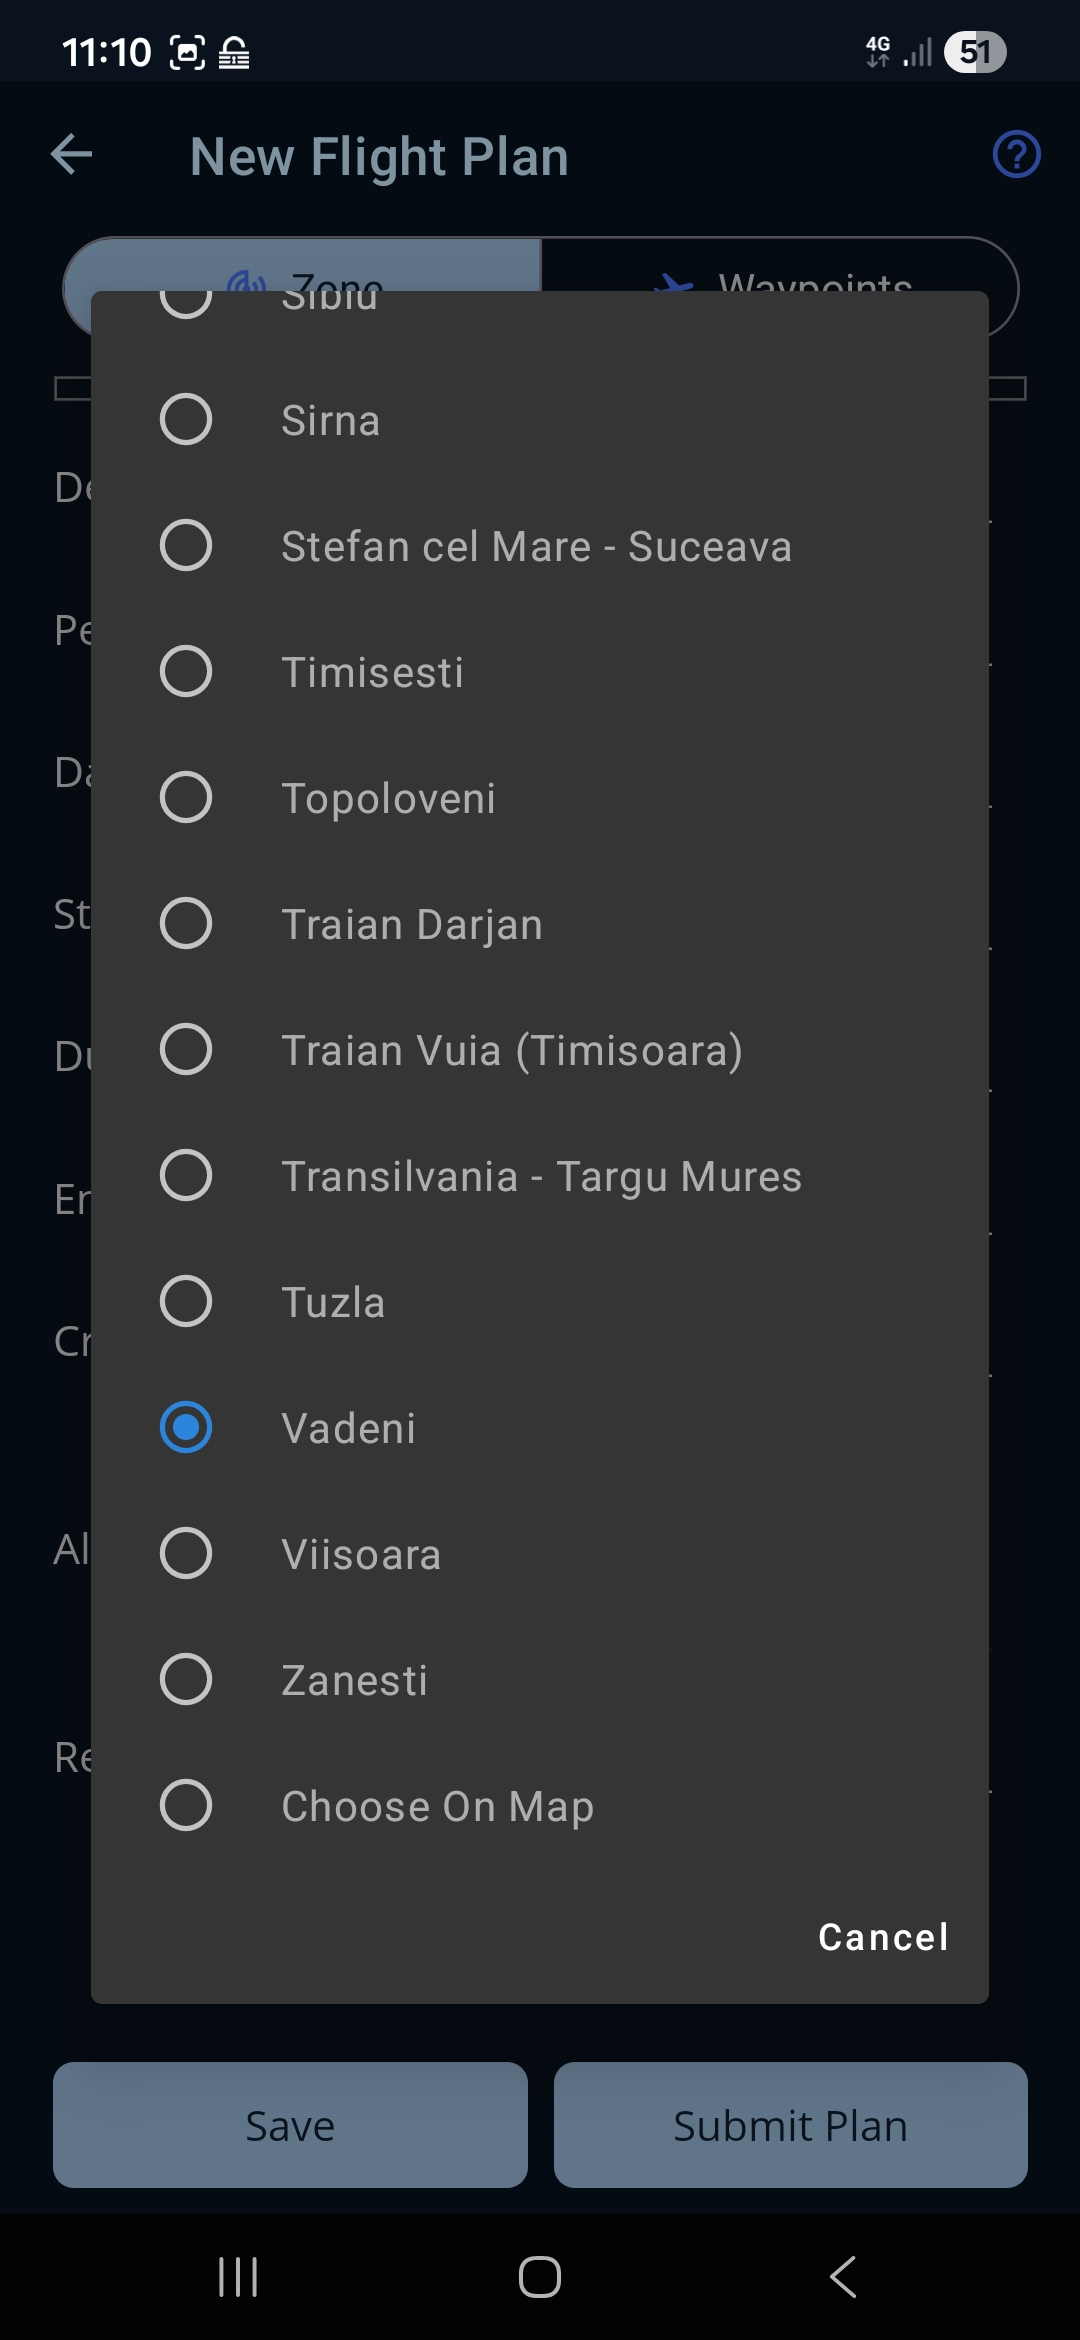
- Finding an aerodrome. Each aerodrome field is a type-to-filter box (placeholder “Search airport or ICAO”): start typing an ICAO code or a name and pick from the matches — the list shows both, for example LRBV — Brasov-Ghimbav.
- “Choose On Map”. Every aerodrome picker (Departure, Destination, and both Alternates) ends with a Choose On Map option. Pick it when the place you need isn't in the built-in list — you'll then position it yourself on the map (see Saving and submitting below and the Route Map page).
- Intermediate Waypoints. A list of points along the route, with a header showing how many you have. Tap + Map to add waypoints — this opens the map route builder (see below), not a dialog. Each waypoint row shows its name and coordinates with Edit and Remove buttons. When the list is empty it reads “No waypoints yet. Tap '+ Map' to add one.”
Adding waypoints on the map
Tapping + Map takes you to the map route builder, where you place as many waypoints as you like by tapping the map, then tap Finish Plan to return here with them filled in. (You need a departure and destination chosen first.) See the Route Map reference page for the full set of map controls.
Back on the form, an existing waypoint's Edit button opens a small dialog to change its name (and, for non-VFR flights, its altitude and speed); Remove deletes it from the route.
Formation flight
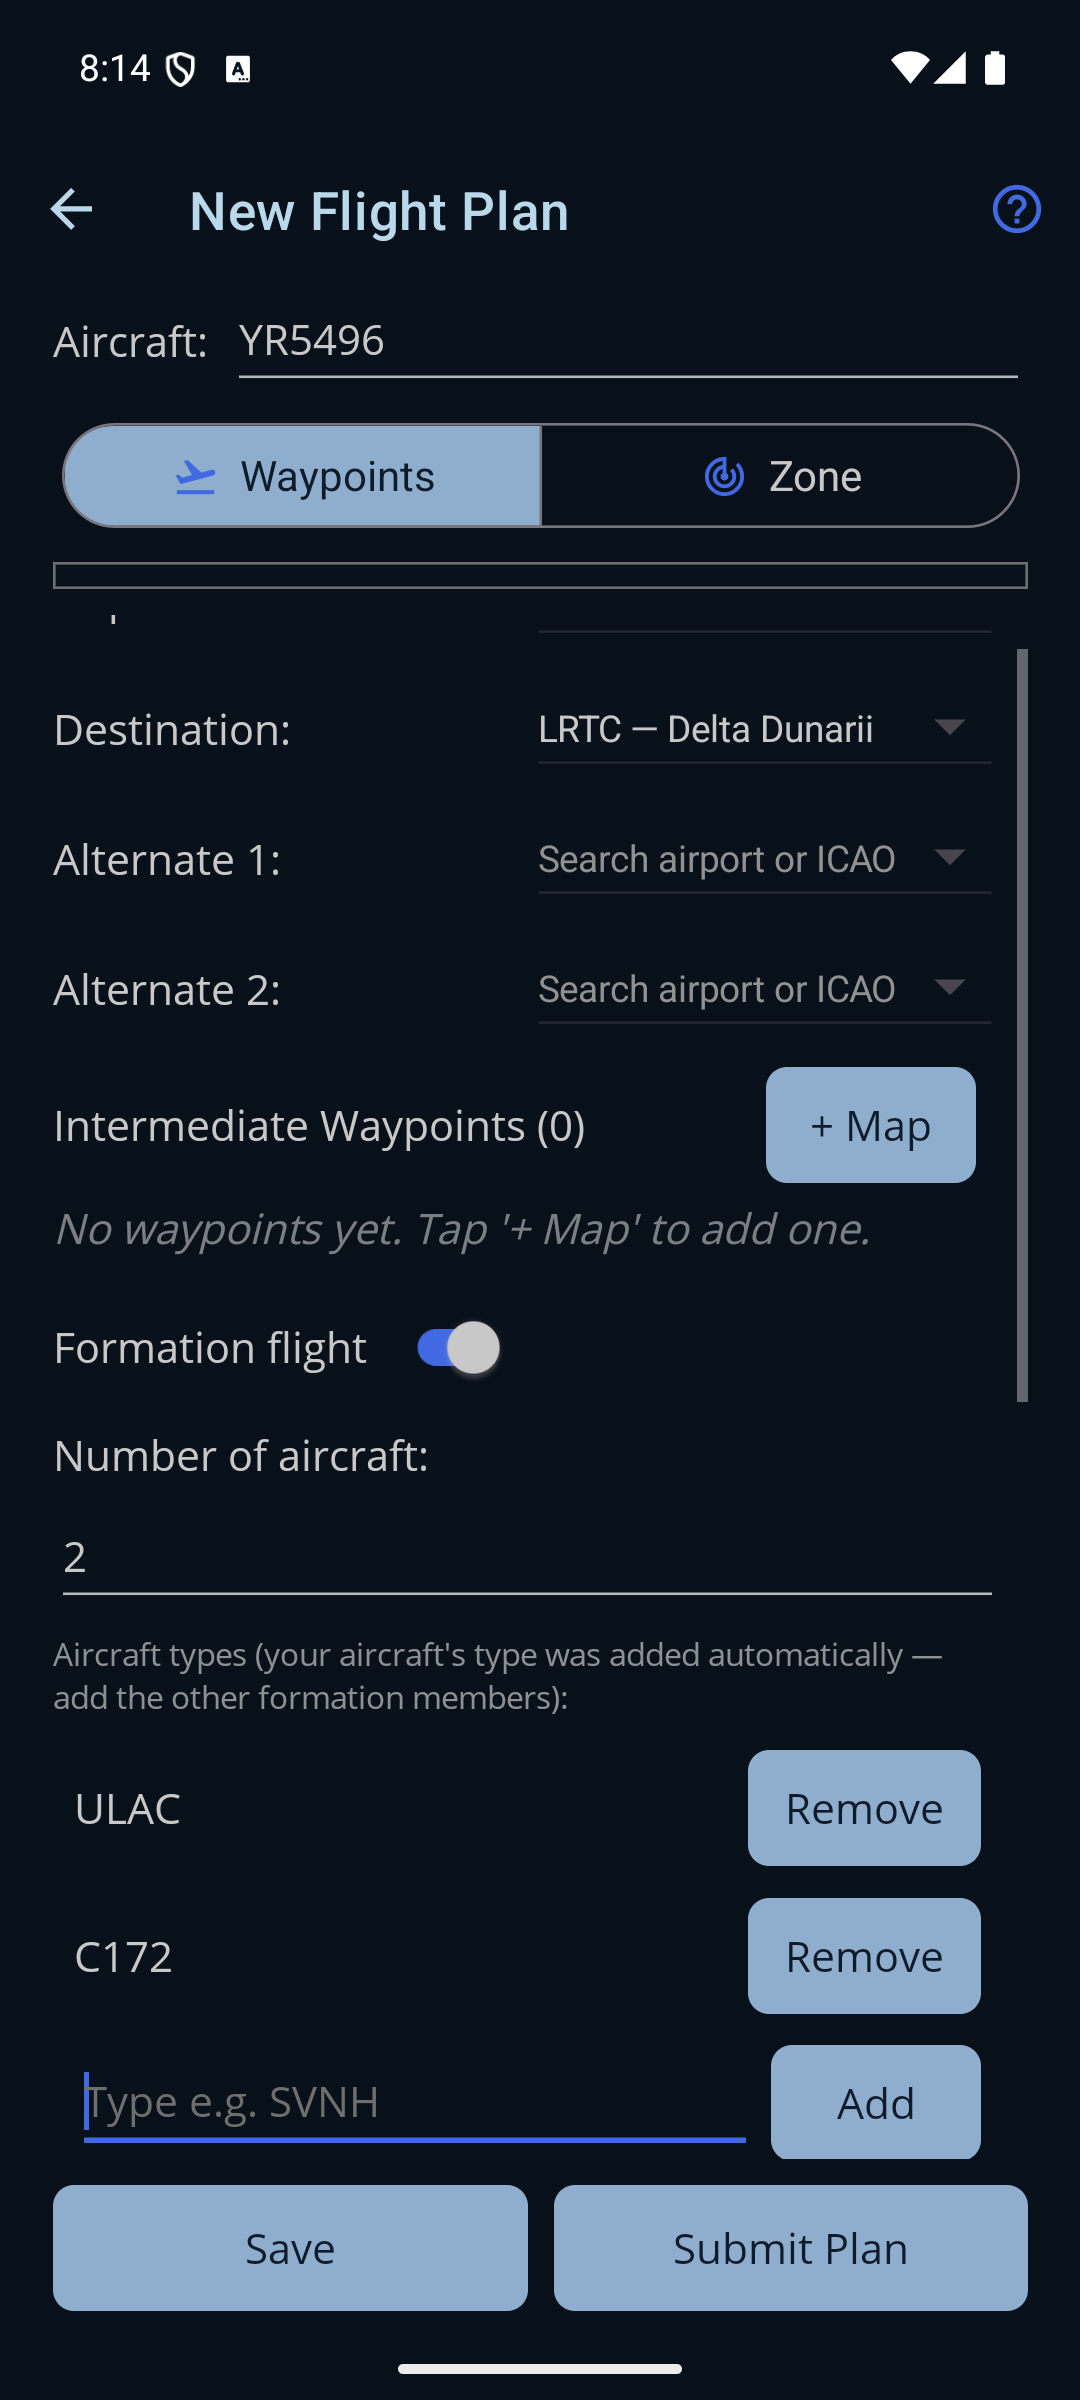
Below the waypoint list — in Waypoint mode only — a Formation flight switch declares that you are flying as a formation, so the plan can name how many aircraft there are and what types they are.
- Number of aircraft. Between 2 and 99. Turning the switch on sets it to 2, since a formation of one isn't a formation; anything outside the range shows “Number of aircraft must be between 2 and 99.” and blocks saving.
- Aircraft types. A list of the types in the formation. Your own aircraft's type is added for you when you turn the switch on — the hint reads “Aircraft types (your aircraft's type was added automatically — add the other formation members)”. Type each other member into the box (placeholder “Type e.g. SVNH”) and tap Add; Remove takes a row off the list.
- What you type is tidied up. Entries are upper-cased and stripped of anything that isn't a letter or digit — so
C-172is stored asC172— and a type already in the list is not added twice.
Saving and submitting
Two buttons sit at the bottom of the form:
- Save. Stores the plan as a draft you can return to and change later.
- Submit Plan. Asks which authority to file with, then shows that authority's own summary of what will be sent, and files it once you accept.
Both buttons require a valid form. Submitting also requires a verified login for the authority you pick — set those up on the Pilot Profile page first.
New plans default the off-block time to about an hour ahead, and submitting requires it to be at least one hour in the future — if it isn't, adjust the Date / Start Time before filing.
Choosing where to file
Tapping Submit Plan opens a “Submit flight plan” sheet from the bottom of the screen with the two channels on it:
- ROMATSA — “ICAO flight plan · valid for any VFR flight”. The standard ICAO flight plan, filed through flightplan.romatsa.ro. It is legal for any VFR flight, which is why it is listed first.
- AACR — vfr.caa.ro — “VFR notification · Class G airspace only”. A VFR notification filed with the Romanian Civil Aeronautical Authority through vfr.caa.ro. It is not an ICAO flight plan and is valid only for a flight conducted entirely in Class G airspace — deciding whether yours qualifies is yours to make.
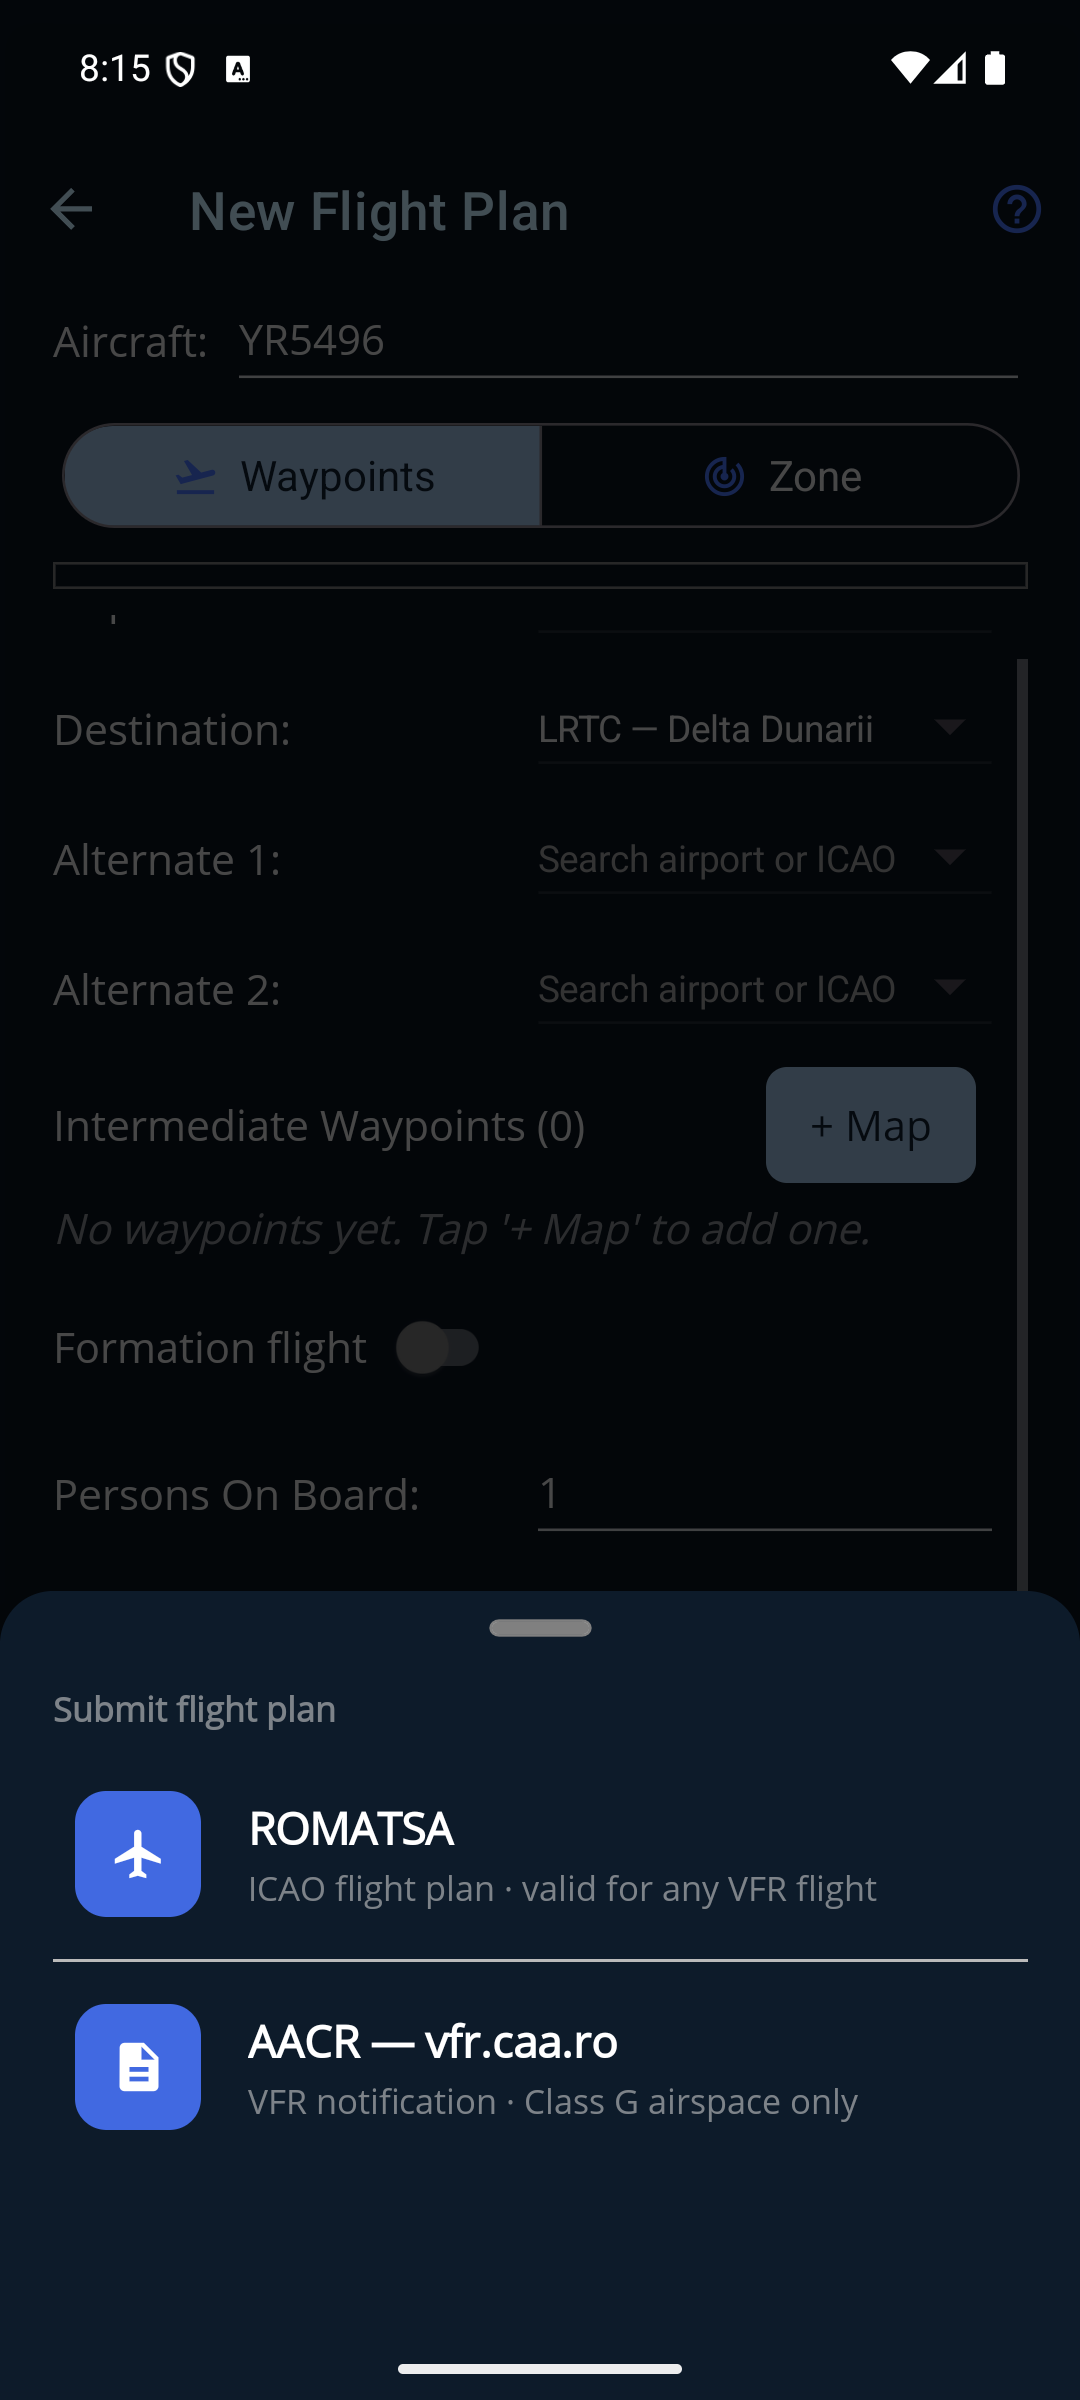
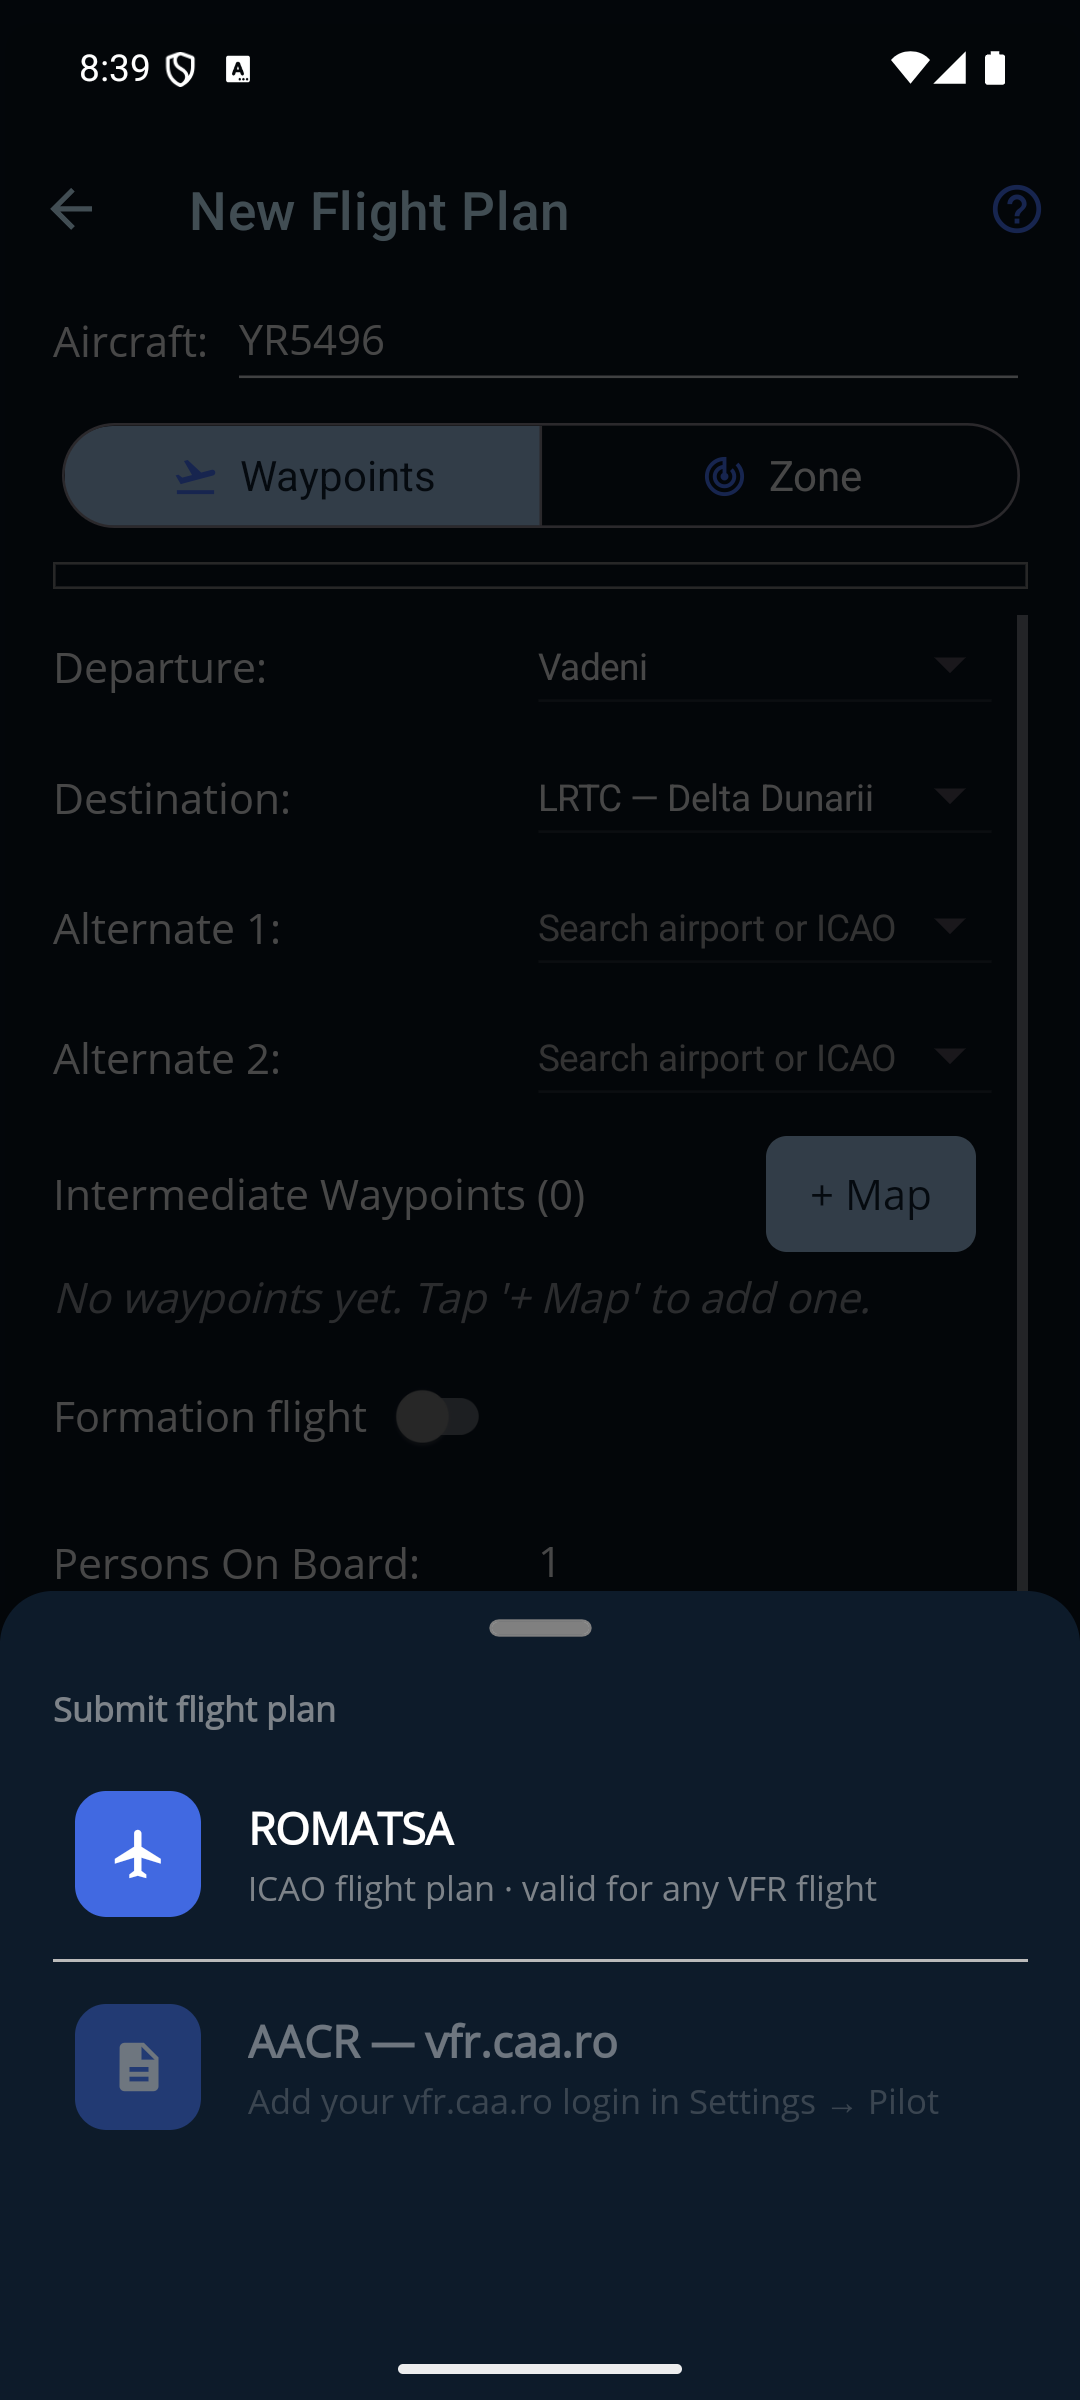
Both rows always appear. A channel whose login you haven't verified yet is dimmed and inert, and its line reads “Add your ROMATSA login in Settings → Pilot” (or “Add your vfr.caa.ro login…”) so you can see the channel exists and what's missing. Swipe the sheet away or tap outside it to back out — nothing is filed until you tap a row.
The confirmation, and what happens after
Whichever channel you pick, the app shows you exactly what it is about to send and waits for you to tap Send. The two look different because they are different documents: an assembled ICAO flight plan for ROMATSA, and a plain-language VFR notification summary for AACR, which restates the Class G restriction before you commit.
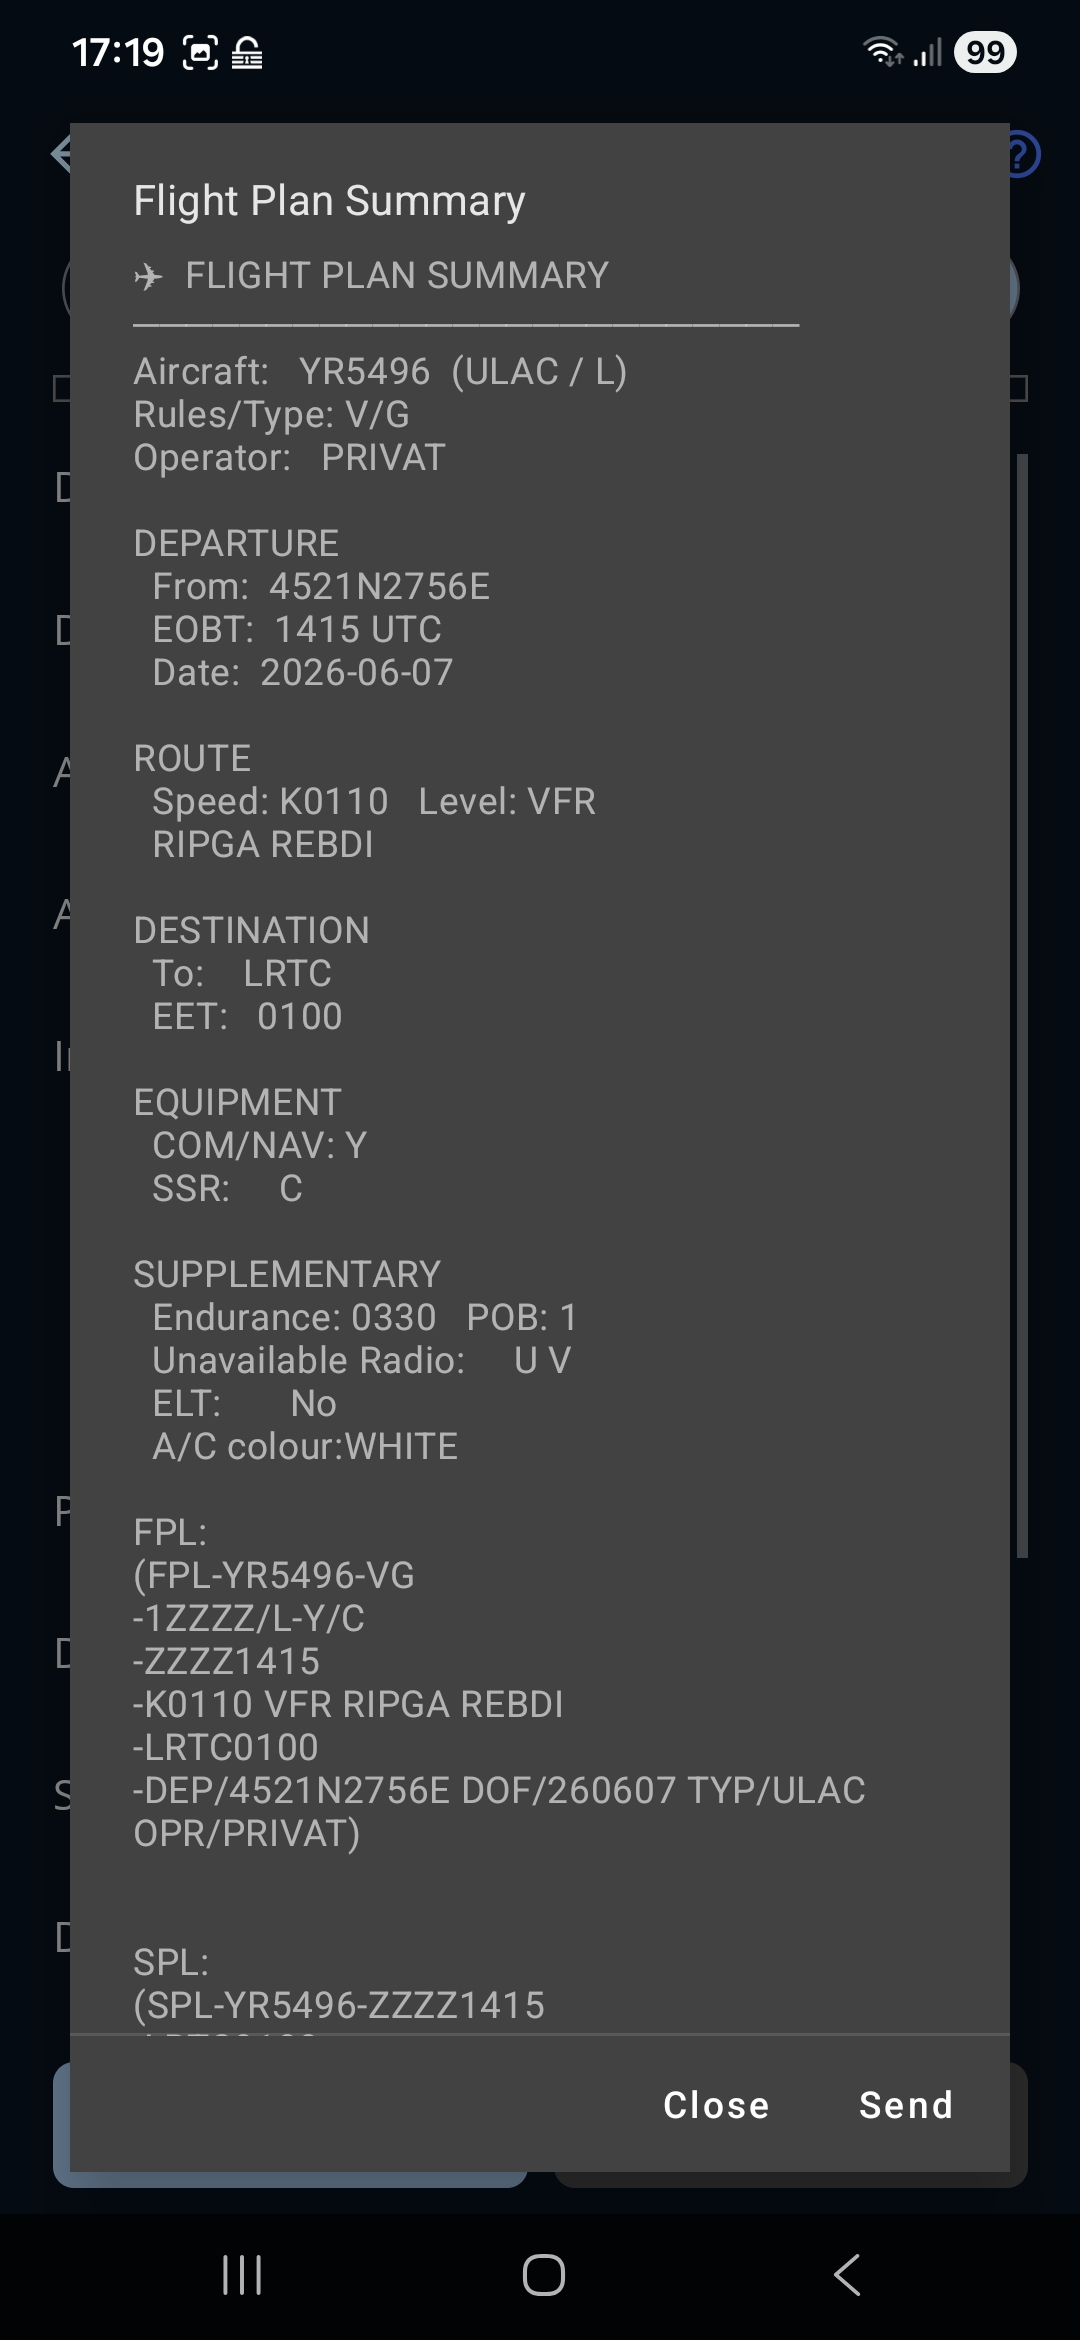
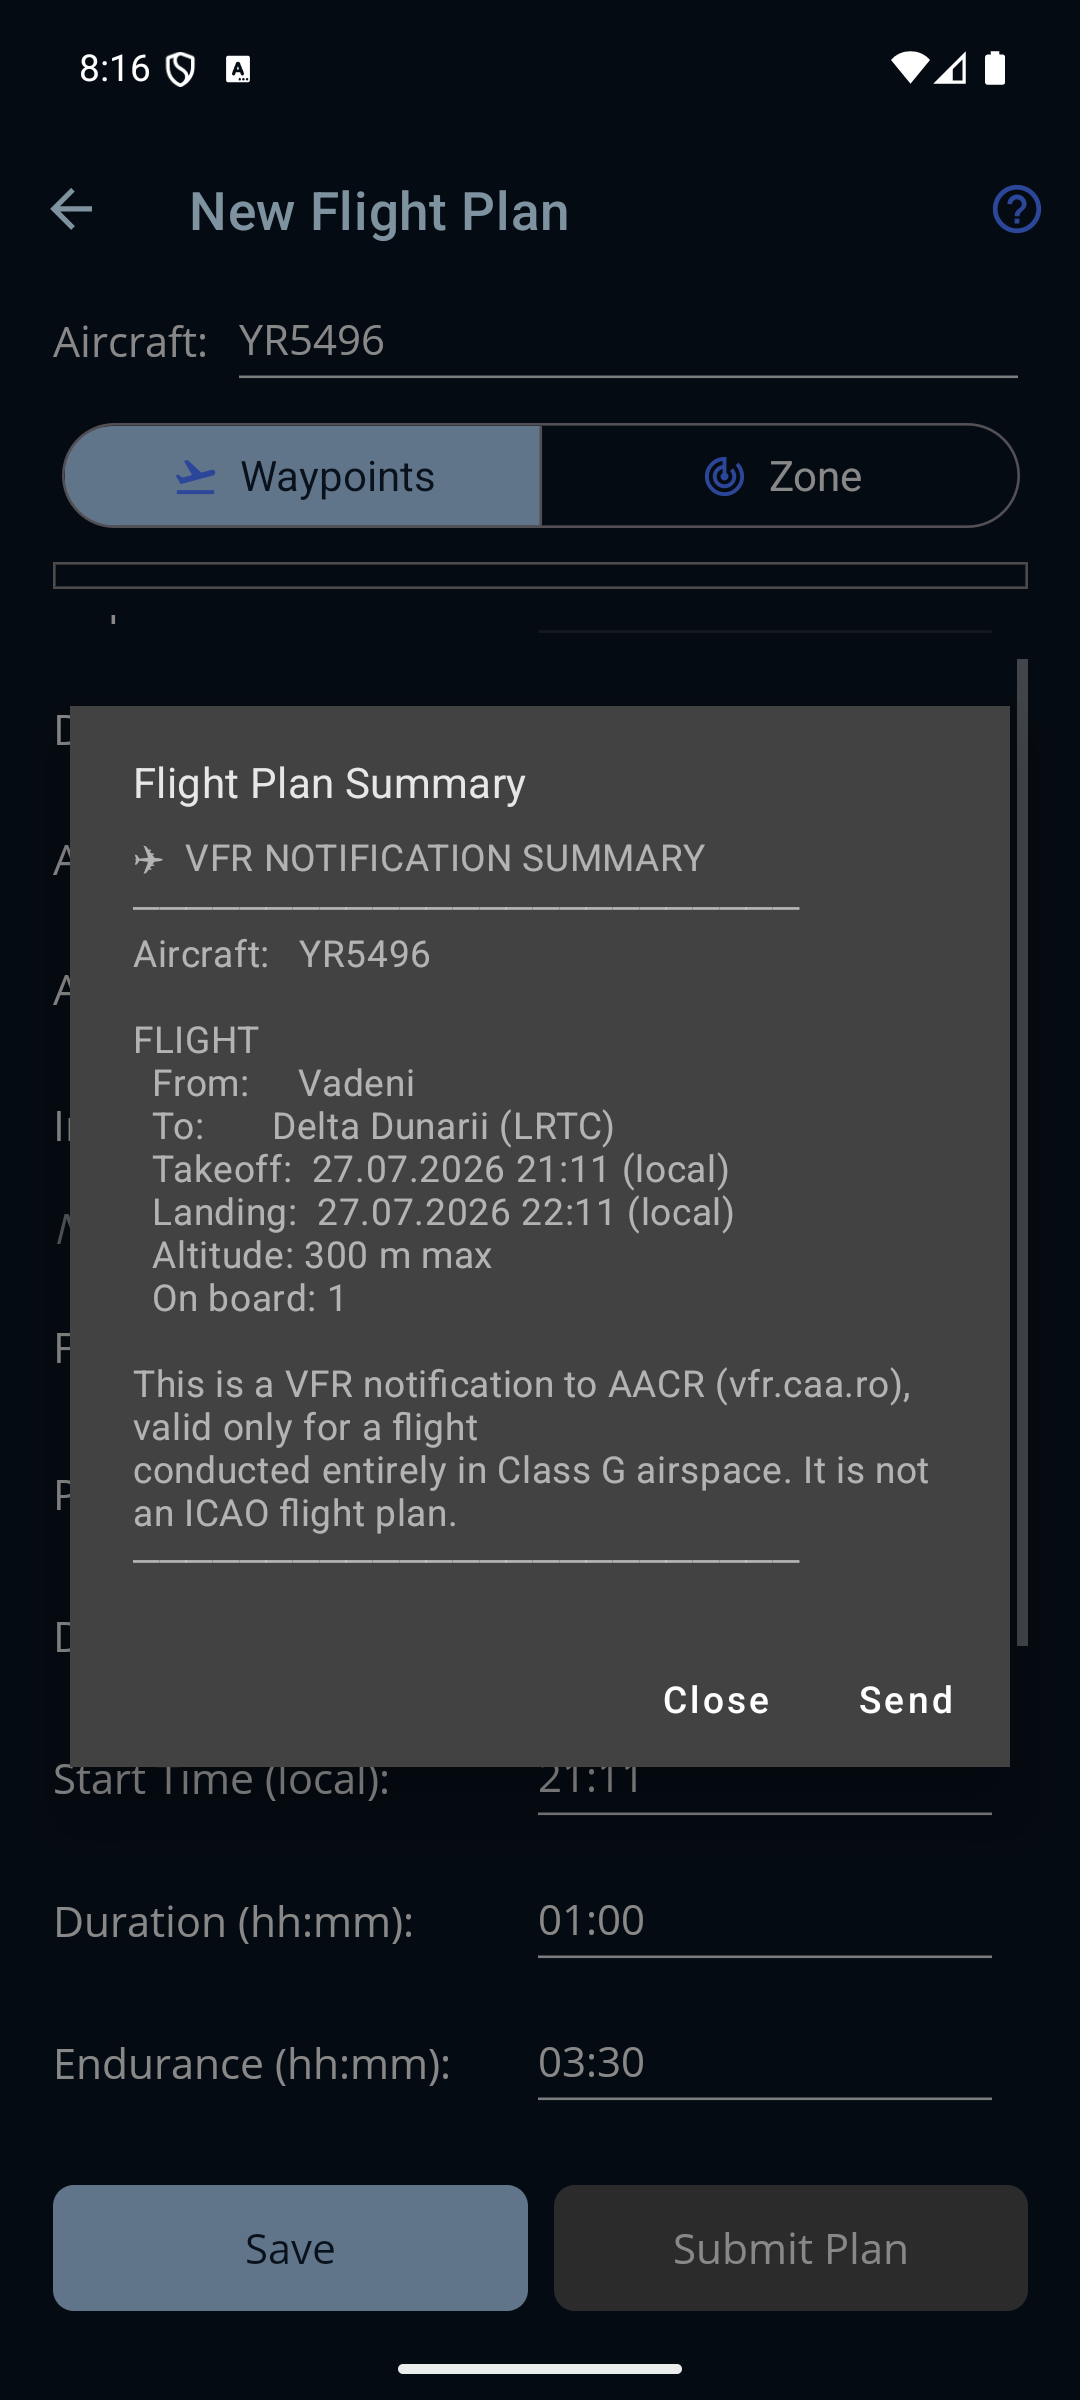
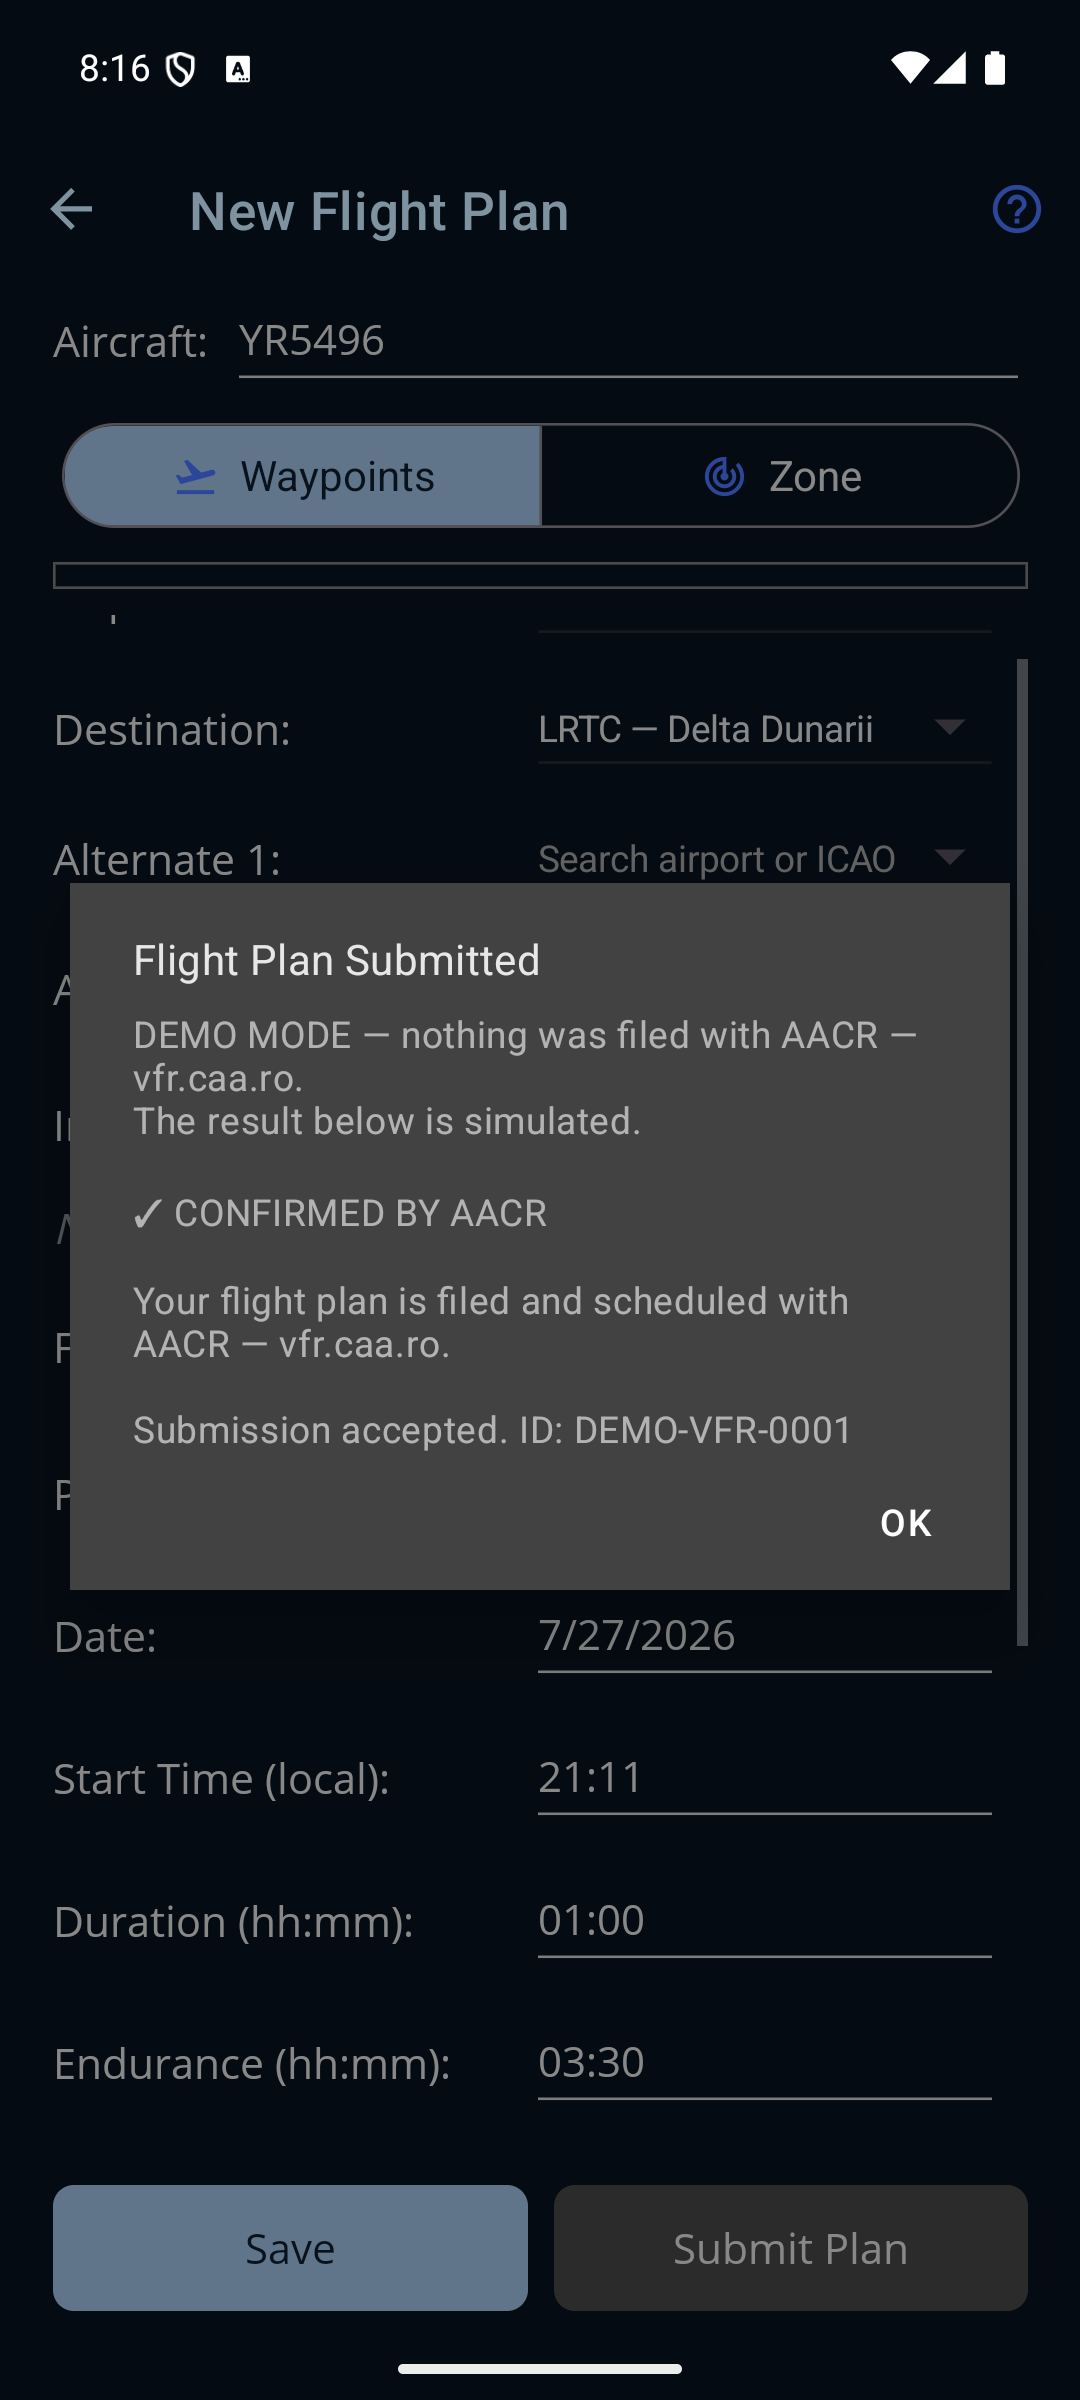
On success the plan's status becomes Submitted and a notice tells you what the authority said. There are three possible answers:
- ✓ CONFIRMED BY … — the app looked the plan up on the authority's own system straight after filing and found it. Nothing more to do.
- ⚠ ACCEPTED BUT NOT FOUND — your submission was accepted, but the app couldn't find the plan when it looked. Check the portal yourself before you fly.
- ⚠ EARLY ACCESS — NOT YET CONFIRMED — the app couldn't check, so you should. This is always the answer for ROMATSA, which publishes no filing status the app can read: confirm through ROMATSA's own confirmation (email/phone) as you always have.
If the app can't reach its own pre-flight check it files anyway and adds a “Heads up” advisory naming the authority.
A note on the screenshots: these were taken in the app's offline demo mode, so where a real
submission would show the authority's own reference you'll see a DEMO-… one, and a
“DEMO MODE — nothing was filed” line appears above the notice. Nothing else about
the screens differs.
“Go To Map” before submitting
If any aerodrome you picked is set to Choose On Map and hasn't been placed yet, the right-hand button reads Go To Map instead of Submit Plan. Tap it to open the map, position the outstanding point(s), and tap Finish Plan — back on the form the button becomes Submit Plan and you can file as usual.
← Back to the manual · Next: Route Map →